Apr 212016
 

I recently had the task to setup and test a new Linux Internet gateway host as a replacement to an existing router. The setup is classical with some individual ports such as HTTP being forwarded with DNAT to some backend systems.

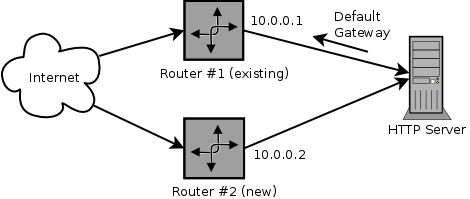
Redundant router setup requiring policy routing

Redundant router setup requiring policy routing

The new router, from now on I will call it router #2, should be tested and put into operation without downtime. Obviously this means that I had to run the two routers in parallel for a while. The backend systems however, only know one default gateway. Accessing a service through a forwarded port on router #2 resulted in a timeout, as the backend system sent the replies to the wrong gateway where they were dropped.

Fortunately iptables and iproute2 came to my rescue. They enable you to implement policy routing on Linux. This means that the routing decision is not (only) made based on the destination address of a packet as in regular routing, but additional rules are evaluated. In my case: Every connection opened through router #2 has to be replied via router #2.

Using iptables/iproute2 for this task this means: Incoming packets with the source MAC address from router #2 are marked with help of the iptables ‘mark’ extension. The iptables ‘connmark’ extension will then help to associate outgoing packets to the previously marked connection. Based on the mark of the outgoing packet a custom routing policy will set the default gateway to router #2. Easy, eh?

Configuration
Now I’ll show some commands how this can be accomplished. The following commands assume that the iptables rule set is still empty and are for demonstration purpose only. Likely they have to be adjusted slightly in a real configuration.

First the routing policy will be setup:

  1. Define a custom routing table. There exist some default tables, so the custom entry shouldn’t overlap with those. For better understanding I will call it ‘router2’:

    # echo "200 router2" >> /etc/iproute2/rt_tables

  2. Add a rule to define the condition which packets should lookup the routing in the previously created table ‘router2’:
    &nbps;
    # ip rule add fwmark 0x2 lookup router2

    This means that IP packets with the mark ‘2’ will be routed according to the table ‘router2’.

  3. Set the default gateway in the ‘router2’ table to the IP address of router #2 (e.g. 10.0.0.2):

    # ip route add default via 10.0.0.2 table router2

  4. To make sure the routing cache is rebuilt, it need to be flushed after changes:
    # ip route flush cache

Afterwards I had to make sure that the involved connections coming from router #2 are marked appropriately (above the mark ‘2’ was used). The ‘mangle’ table is a part of the Linux iptables packet filter and meant for modifying network packets. This is the place where the packet markings will be set.

  1. The first iptables rule will match all packets belonging to a new connection coming from router #2 and sets the previously defined mark ‘2’:

    # iptables --table mangle --append INPUT \
    --protocol tcp --dport 80 \
    --match state --state NEW \
    --match mac --mac-source 52:54:00:c2:a5:43 \
    ! --source 10.0.0.0/24 \
    --jump MARK --set-mark 0x2

    The packets being marked are restricted to meet the following requirements:

    • being sent by the network adapter of router #2 (--mac-source)
    • don’t originate in the local network (! --source)
    • target destination port 80 (--dport: example for the HTTP port being forwarded by router #2)
    • belong to a new connection (--state NEW)

    Of course additional (or less) extensions can be used to filter the packets according to individual requirements.

  2. Next, the incoming packets are given to the ‘connmark’ extension which will do the connection tracking of the marked connections:

    # iptables --table mangle --append INPUT \
    --jump CONNMARK --save-mark

  3. The packets which can be associated with an existing connection are also marked accordingly:

    # iptables --table mangle --append INPUT \
    --match state --state ESTABLISHED,RELATED \
    --jump CONNMARK --restore-mark

  4. All the previous rules where required that the outgoing packets can finally be marked too:

    # iptables --table mangle --append OUTPUT \
    --jump CONNMARK --restore-mark

Debugging
The following commands and iptables rules should help when setting up and/or debugging policy routing with marked packets:

  • List policy of routing table ‘table2’:

    # ip route show table router2

  • List defined routing tables:

    # cat /etc/iproute2/rt_tables

  • Log marked incoming/outgoing packets to syslog:

    # iptables -A INPUT -m mark --mark 0x2 -j LOG
    # iptables -A OUTPUT -m mark --mark 0x2 -j LOG

Dec 032015
 

SuperMicro server mainboards often include a dedicated Baseband Management Controller (BMC) which offers out-of-band management of the server system. This is a dedicated embedded chip (Specifications) which allow to power cycle the machine, monitor hardware variables, update firmware, access the operating system console and much more. If you are used to big brand server systems, then you might be more familiar with the term iLO, which is the HP Integrated Lights-Out, or IMM, which is the IBM Integrated Management Module. The basic functionality is always comparable.

FreeIPMI Management Utility

A nice fact is, that most of these out-of-band management solutions support the Intelligent Platform Management Interface (IPMI) specification, which defines an interface for accessing the various functionalities from an operating system (OS) or the network (e.g. for monitoring or OS recovery). For Linux there exists GNU FreeIPMI which is a collection of powerful tools for accessing IPMI-compatible BMCs. It is available via default package manager on all major Linux distributions.

Linux Kernel Configuration
As mentioned before, on Linux there are two different ways to access the BMC via IPMI. The first way is directly from the host running on the board connected to the BMC. The connection is done via kernel modules. Make sure you have at least the ipmi_defintf and ipmi_si modules loaded. If your kernel doesn’t include this modules, you might need to add them to your kernel configuration. The corresponding settings can be found under:

Device Drivers --->
   Character Devices --->
      <M> IPMI top-level message handler --->
          [ ]   Generate a panic event to all BMCs on a panic (NEW)
          <M>   Device interface for IPMI (NEW)
          <M>   IPMI System Interface handler (NEW)
          <M>   IPMI SMBus handler (SSIF) (NEW)
          <M>   IPMI Watchdog Timer (NEW)
          <M>   IPMI Poweroff (NEW)

You can check if it’s working by invoking ipmi-detect which should then output something like this:

# ipmi-locate
Probing KCS device using DMIDECODE... done
IPMI Version: 2.0
IPMI locate driver: DMIDECODE
IPMI interface: KCS
BMC driver device: 
BMC I/O base address: 0xCA2
Register spacing: 1

Probing SMIC device using DMIDECODE... FAILED

Probing BT device using DMIDECODE... FAILED

Probing SSIF device using DMIDECODE... FAILED

Probing KCS device using SMBIOS... done
IPMI Version: 2.0
IPMI locate driver: SMBIOS
IPMI interface: KCS
BMC driver device: 
BMC I/O base address: 0xCA2
Register spacing: 1

Probing SMIC device using SMBIOS... FAILED

Probing BT device using SMBIOS... FAILED

Probing SSIF device using SMBIOS... FAILED

[...]

There was an IPMI 2.0 compatible chip found, so we are good to go.

Network Configuration
The second way to connect via IPMI to the BMC is over the network. For this, there often is a dedicated network port on the mainboard that obviously needs to be connected to a network switch over which you can access it. By default the SuperMicro BMC is configured to get an IP address via DHCP. If the local IPMI connection is working, you can get the IP address by executing:

# ipmi-config --checkout --section Lan_Conf

#
# Section Lan_Conf Comments 
#
# In the Lan_Conf section, typical networking configuration is setup. Most users 
# will choose to set "Static" for the "IP_Address_Source" and set the 
# appropriate "IP_Address", "MAC_Address", "Subnet_Mask", etc. for the machine. 
#
Section Lan_Conf
        ## Possible values: Unspecified/Static/Use_DHCP/Use_BIOS/Use_Others
        IP_Address_Source                             Use_DHCP
        ## Give valid IP address
        IP_Address                                    192.168.1.15
        ## Give valid MAC address
        MAC_Address                                   0C:C4:7A:73:18:4F
        ## Give valid Subnet Mask
        Subnet_Mask                                   255.255.255.0
        ## Give valid IP address
        Default_Gateway_IP_Address                    192.168.1.1
        ## Give valid MAC address
        Default_Gateway_MAC_Address                   00:0D:B9:22:15:A2
        ## Give valid IP address
        Backup_Gateway_IP_Address                     0.0.0.0
        ## Give valid MAC address
        Backup_Gateway_MAC_Address                    00:00:00:00:00:00
EndSection

Otherwise you might need to search the DHCP server log for an entry, which IP address was given to the BMC. I recommend to set the BMC IP address to a fixed value, to minimize the risk to loose connectivity in case of major data center issue. This can be done via Web interface at e.g. https://192.168.1.15 or via ipmi-config:

# ipmi-config --commit -e Lan_Conf:IP_Address_Source=Static
# ipmi-config --commit -e Lan_Conf:IP_Address=192.168.1.42

Alternatively you can write the configuration in file and commit it with the --filename argument. E.g. create a static-network.conf:

# Static network configuration for the BMC
Section Lan_Conf
        IP_Address_Source                             Static
        IP_Address                                    192.168.1.42
EndSection

Unfortunately the IP_Address_Source key cannot be changed concurrently with other Lan_Conf keys. So we had to run the commit command twice, when specifying the new values on the command line and the same is true with the configuration file option. The first time it will set the IP_Address_Source:

# ipmi-config --commit --filename=static-network.conf

And the second time, it will set the new IP_address:

# ipmi-config --commit --filename=static-network.conf

However, this is an exception and most other key/value pairs can be changed concurrently. See the ipmi-config(8) man-page for more details.

Eventually we can check if the IPMI interface is reachable via network. This can be done with the ipmi-ping tool. If the --verbose argument is added, it will even output some information about the configured authentication settings. E.g.:

# ipmi-ping --count 1 --verbose 192.168.1.42
ipmi-ping 192.168.1.42 (192.168.1.42)
response received from 192.168.1.42: rq_seq=23, auth: none=clear md2=set md5=set password=set oem=clear anon=clear null=clear non-null=set user=clear permsg=clear 
--- ipmi-ping 192.168.1.42 statistics ---
1 requests transmitted, 1 responses received in time, 0.0% packet loss
Configure Serial-over-LAN (SoL) Console Access

A neat feature of a BMC is the ability to remotely access the Linux console even when the regular network connection to the server is not working any more. However, this needs some additional configuration in the operating system.

Check SoL Settings in BIOS
First, we will check the BIOS settings to make sure the SoL feature is enabled. Note that accessing the BIOS usually already works in the default configuration, so if you are adventurous, you can already connect over remote IPMI (for demonstration purpose I’ll use the default user ADMIN):

$ ipmi-console -h 192.168.1.42 -u ADMIN -P

By default you won’t have access to the Linux system yet, so reboot the system via SSH so the BIOS can be setup accordingly. Unfortunately, the IPMI console won’t show the system’s POST output, so you have to keep pressing the DEL button in the terminal with the open IPMI console until you see the BIOS main screen. Then go to Advanced -> Serial Port Console Redirection and make sure, the SOL Console Redirection is enabled. Also remember how many additional serial ports you have available for configuration in this menu. This will become important when selecting the correct console in the Linux configuration. E.g. my board only has one other serial port (COM1) available and for this one console redirection one mustn’t be enabled for SoL to work correctly.
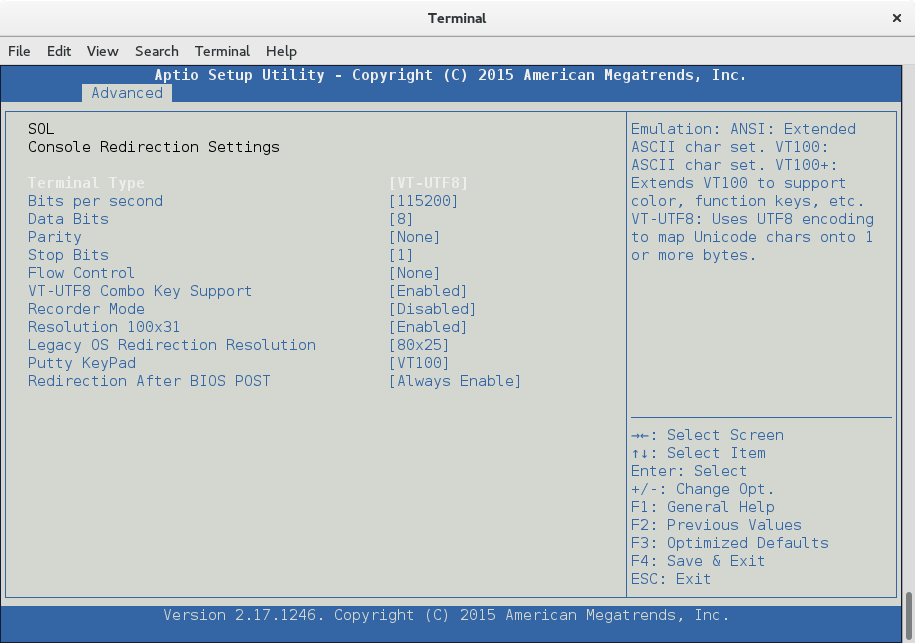
SuperMicro BIOS settings accessed via ipmi-console

SuperMicro BIOS settings accessed via ipmi-console

If you want to see more verbose POST output, also disable Quiet Boot in the Advanced -> Boot Feature menu.

Leave the BIOS by pressing Save Changes and Reset. After a short while you should be greeted by the Grub menu. However, there won’t be any more output, as Linux doesn’t know yet, where to connect to the SoL console. To exit the IPMI console, you have to press &..

Setup Serial Console in Linux
If you have a systemd-based distribution all you need to do is to modify the kernel command line and add a serial console. Edit /etc/default/grub and extend the GRUB_CMDLINE_LINUX variable as following:

GRUB_CMDLINE_LINUX="rd.lvm.lv=vg00/swap rd.lvm.lv=vg00/slash rhgb quiet console=tty0 console=ttyS1,115200n8"

Important: This has to be /dev/ttyS1 in case the BIOS knows only knows one additional serial port (which would correspond to /dev/ttyS0). If you have two additional serial ports in the BIOS (COM1/COM2), you must set /dev/ttyS2 here. Don’t configure Grub 2 to output itself to the serial console, as this is still handled by the default SoL configuration forwarding the initial system output.

Regenerate the grub.cfg with:

# grub2-mkconfig -o /boot/grub2/grub.cfg

You might need to adjust the command and grub.cfg path according to your installation. The next time when the system is booted, the Linux system output will be available on the serial terminal and there will also be a login prompt. If you don’t have a systemd-based system, you additionally need to enable the serial console login terminal in the /etc/inittab. E.g.:

T1:23:respawn:/sbin/getty -L ttyS1 115200 vt100
Remotely Manage the System over IPMI

Now everything we need is in place. We can independently from the Linux operating system or the local system console:

  1. Configure the BMC via ipmi-config (see above)
  2. Access the Linux console via ipmi-console
  3. Query system sensor values (temperatures, voltages, …) via ipmi-sensors
  4. Query system event log via ipmi-sel
  5. Initiate system startup and power reset via ipmi-power

Even tough I have the latest available IPMI firmware installed, it sometimes happened to me, that the SoL wouldn’t properly connect to the Linux console any more after I disconnected when being in the BIOS. Or that I could navigate through the BIOS but it wouldn’t refresh the screen. Unfortunately the only way that I found to fix this, was to reboot the BMC. Of course also this is possible over IPMI:

$ bmc-device -h 192.168.1.42 -u ADMIN -P --cold-reset

There are many other things that you can do via IPMI. Also there are other tools which can access IPMI-enabled BMCs. Another famous one is ipmitool. You might want to checkout Adam Sweet’s wiki on IPMI on Linux for more details how to use ipmitool. Personally, I prefer FreeIPMI for being a GNU project, being very intuitive to use and so far it worked perfectly well for everything I needed.

If you have some hints or additions, please leave a comment below. Thanks for reading.
Dec 012015
 

I recently had the challenge to migrate a physical host running Debian, installed on a ancient 32bit machine with a software RAID 1, to a virtual machine (VM). The migration should be as simple as possible so I decided to attach the original disks to the virtualization host and define a new VM which would boot from these disks. This doesn’t sound too complicated but it still included some steps which I was not so familiar with, so I write them down here for later reference. As an experiment I tried the migration on a KVM and a Xen host.

Prepare original host for virtualized environment

Enable virtualized disk drivers
The host I wanted to migrate was running a Debian Jessie i686 installation on bare metal hardware. For booting it uses an initramfs which loads the required disk controller drivers. By default the initramfs only includes the drivers for the current hardware, so the paravirtualization drivers for KVM (virtio-blk) or Xen (xen-blkfront) are missing. This can be changed by adjusting the /etc/initramfs-tools/conf.d/driver-policy file to state that not the currently dependent (dep) modules should be loaded, but most:

# Driver inclusion policy selected during installation
# Note: this setting overrides the value set in the file
# /etc/initramfs-tools/initramfs.conf
MODULES=most

Afterwards the initramfs must be rebuilt by running the following command (adjust the kernel version according to the kernel you are running):

# dpkg-reconfigure linux-image-3.16.0-4-686-pae

Now the initramfs contains all required modules to successfully boot the host from a KVM virtio or a Xen blockfront disk device. This can be checked with:

# lsinitramfs /boot/initrd.img-3.16.0-4-686-pae | egrep -i "(xen|virtio).*blk.*\.ko"
lib/modules/3.16.0-4-686-pae/kernel/drivers/block/virtio_blk.ko
lib/modules/3.16.0-4-686-pae/kernel/drivers/block/xen-blkback/xen-blkback.ko
lib/modules/3.16.0-4-686-pae/kernel/drivers/block/xen-blkfront.ko

Enable serial console
To easily access the server console from the virtualization host, it’s required to setup a serial console in the guest, which must be defined in /etc/default/grub:

[...]
GRUB_CMDLINE_LINUX="console=tty0 console=ttyS0,115200n8"
GRUB_SERIAL_COMMAND="serial --unit=0 --speed=115200 --word=8 --parity=no --stop=1"
[...]
# Uncomment to disable graphical terminal (grub-pc only)
GRUB_TERMINAL="console serial"

After regenerating the Grub configuration, the boot loader and local console will then also be accessible via virsh console:

# grub-mkconfig -o /boot/grub/grub.cfg
Run the host on a KVM hypervisor

KVM is nowadays the de-facto default virtualization solution for running Linux on Linux and is very well integrated in all major distributions and a wide range of management tools. Therefore it’s really simple to boot the disks into a KVM VM:

  • Make sure the disks are not already assembled as md-device on the KVM host. I did this by uninstalling the mdadm utility.
  • Run the following virt-install command to define and start the VM:
    # virt-install --connect qemu:///system --name myhost --memory 1024 --vcpus 2 --cpu host --os-variant debian7 --arch i686 --import --disk /dev/disk/by-id/ata-WDC_WD10EFRX-68PJCN0_WD-WCC4J4527214 --disk /dev/disk/by-id/ata-WDC_WD10EFRX-68PJCN0_WD-WCC4J4366412 --network bridge=virbr0 --graphics=none

To avoid confusion with the disk enumeration of the KVM host kernel, the disk devices are given as unique device paths instead of e.g. /dev/sdb and /dev/sdc. This clearly identifies the two disk devices which will then be assembled to a RAID 1 by the guest kernel.

Run the host on a Xen hypervisor

Xen has been a topic in this blog a few times before as I’m still using it since its early days. After a long time of major code refactorings it also made huge steps forward within the last few years, so that nowadays it’s nearly as easy to setup as KVM and again well supported in the large distributions. Because its architecture is a bit different and Linux is not the only supported platform some things work not quite the same as under KVM. Let’s find out…

Prepare Xen Grub bootloader
Xen virtual machines can be booted in various different ways, also depending whether the guest disk is running on an emulated disk controller or as paravirtualized disk. In simple cases, this is done with help of PyGrub loading a Grub Legacy grub.conf or a Grub 2 grub.cfg from a guests /boot partition. As my grub.cfg and kernel is “hidden” in a RAID 1 a fully featured Grub 2 is required. It is perfectly able to load its configuration from advanced disk setups such as RAID arrays, LVM volumes and more. With Xen such a setup is only possible when using a dedicated boot loader disk image which must be in the target architecture of the virtual machine. As I want to run a 32bit virtual machine, a i386-xen Grub 2 flavor needs to be compiled as basis for the boot loader image:

  • Clone the Grub 2 source code:
    $ git clone git://git.savannah.gnu.org/grub.git
  • Configure and build the source code. I was running the following commands on a Gentoo Xen server without issues. On other distributions you might need to install some development packages first:
    $ cd grub
    $ ./autogen.sh
    $ ./configure --target=i386 --with-platform=xen
    $ make -j3
  • Prepare a grub.cfg for the Grub image. The Grub 2 from the Debian guest host was installed on a mirrored boot disk called /dev/md0 which was mounted to /boot. Therefore the Grub image must be hinted to load the actual configuration from there:
    # grub.cfg for Xen Grub image grub-md0-i386-xen.img
    normal (md/0)/grub/grub.cfg
  • Create the Grub image using the previously compiled Grub modules:
    # grub-mkimage -O i386-xen -c grub.cfg -o /var/lib/libvirt/images/grub-md0-i386-xen.img -d ~user/grub/grub-core ~user/grub/grub-core/*.mod

A more generic guide about generating Xen Grub images can be found at Using Grub 2 as a bootloader for Xen PV guests.

Define the virtual machine
virt-install can also be used to import disk (images) as Xen virtual machines. This works perfectly fine for e.g. importing Atomic Host raw images, but unfortunately the setup now is a bit more complicated. It requires me to specify the custom Grub 2 image as guest kernel for which I couldn’t find a corresponding virt-install argument (using v1.3.0). Therefore I first created a plain Xen xl configuration file and then converted it to a libvirt XML file. The initial configuration /etc/xen/myhost.cfg looks as following:

name = "myhost"
kernel = "/var/lib/libvirt/images/grub-md0-i386-xen.img"
memory = 1024
vcpus = 2
vif = [ 'bridge=virbr0' ]
disk = [ '/dev/disk/by-id/ata-WDC_WD10EFRX-68PJCN0_WD-WCC4J4527214,raw,xvda,rw', '/dev/disk/by-id/ata-WDC_WD10EFRX-68PJCN0_WD-WCC4J4366412,raw,xvdb,rw' ]

Eventually this configuration can be converted to a libvirt domain XML with the following command:

# virsh domxml-from-native --format xen-xl --config /etc/xen/myhost.cfg > /etc/libvirt/libxl/myhost.xml
# virsh --connect xen:/// define /etc/libvirt/libxl/myhost.xml
Summary

At the end, I successfully converted the bare metal host to a KVM and/or Xen virtual machine. Once again Xen ended up being a bit more troublesome, but no nasty hacks were required and both configurations were quite straight forward. The boot loader setup for Xen could definitely be a bit simpler, but still it’s nice to see how well Grub 2 and Xen play together now. It’s also pleasing to see, that no virtualization specific configurations had to be made within the guest installation. The fact that the disk device names were changing from /dev/sd[ab] (bare metal) to /dev/vd[ab] (KVM) and /dev/xvd[ab] (Xen) was completely absorbed by the mdadm layer, but even without software RAID the /etc/fstab entries are nowadays generated by the installers in a way, that such migrations are easy possible.

Thanks for reading. If you have some comments, don’t hesitate to write a note below.

Aug 282014
 

Today I just found out, how super easy it is to setup a safe HTTP authentication via Kerberos with help of FreeIPA. Having the experience of managing a manually engineered MIT Kerberos/OpenLDAP/EasyRSA infrastructure, I’m once again blown away by the simplicity and usability of FreeIPA. I’ll describe with only a few commands which can be run within less than 10 minutes how it’s possible to setup a fully featured Kerberos-authenticated Web server configuration. Prerequisite is a FreeIPA server (a simple guide for installation can be found for example here) and a RedHat-based Web server host (RHEL, CentOS, Fedora).

Required Packages:
First we are going to install the required RPM packages:

# yum install httpd mod_auth_kerb mod_ssl ipa-client

Register the Web server host at FreeIPA:
Make sure the Web server host is managed by FreeIPA:

ipa-client-install --domain=example.com --server=ipaserver.example.com --realm=EXAMPLE.COM --mkhomedir --hostname=webserver.example.com --configure-ssh --configure-sshd

Create a HTTP Kerberos Principal and install the Keytab:
The Web server is identified in a Kerberos setup through a keytab, which has to be generated and installed on the Web server host. First make sure that you have a valid Kerberos ticket of a FreeIPA account with enough permissions (e.g. ‘admin’):

# kinit admin
# ipa-getkeytab -s ipaserver.example.com -p HTTP/webserver.example.com -k /etc/httpd/conf/httpd.keytab

This will create a HTTP service principal in the KDC and install the corresponding keytab in the Apache httpd configuration directory. Just make sure that it can be read by the httpd server account:

# chown apache /etc/httpd/conf/httpd.keytab

Create a SSL certificate
No need to fiddle around with OpenSSL. Requesting, signing and installing a SSL certificate with FreeIPA is one simple command:

# ipa-getcert request -k /etc/pki/tls/private/webserver.key -f /etc/pki/tls/certs/webserver.crt -K HTTP/webserver.example.com -g 3072

This will create a 3072 bit server key, generate a certificate request, send it to the FreeIPA Dogtag CA, sign it and install the resulting PEM certificate on the Web server host.

Configure Apache HTTPS
The httpd setup is the only and last configuration which needs to be done manually. For HTTPS set the certificate paths in /etc/httpd/conf.d/ssl.conf:

[...]
SSLCertificateFile /etc/pki/tls/certs/webserver.crt
SSLCertificateKeyFile /etc/pki/tls/private/webserver.key
SSLCertificateChainFile /etc/ipa/ca.crt

Additionally do some SSL stack hardening (you may also want to read this):

[...]
SSLCompression off
SSLProtocol all -SSLv2 -SSLv3 -TLSv1.0
SSLHonorCipherOrder on
SSLCipherSuite "EECDH+ECDSA+AESGCM EECDH+aRSA+AESGCM EECDH+ECDSA+SHA384 EECDH+ECDSA+SHA256 EECDH+aRSA+SHA384 EECDH+aRSA+SHA256 EECDH EDH+aRSA !aNULL !eNULL !LOW !3DES !MD5 !EXP !PSK !SRP !DSS !RC4"

Kerberos HTTP Authentication:
The final httpd authentication settings for ‘mod_auth_kerb‘ are done in /etc/httpd/conf.d/auth_kerb.conf or any vhost you want:

<Location />
  SSLRequireSSL
  AuthType Kerberos
  AuthName "Kerberos Login"
  KrbMethodNegotiate On
  KrbMethodK5Passwd On
  KrbAuthRealms EXAMPLE.COM
  Krb5KeyTab /etc/httpd/conf/httpd.keytab
  require valid-user
</Location>

That’s it! After restarting the Web server you can login on https://webserver.example.com with your IPA accounts. If you don’t already have a valid Kerberos ticket in the Web client, KrbMethodNegotiate On enables interactive password authentication.

Troubleshooting
In case you get the following error message in the httpd error log, make sure the keytab exists and is readable by the httpd account (e.g. ‘apache’):

[Wed Aug 27 07:23:04 2014] [debug] src/mod_auth_kerb.c(646): [client 192.168.122.1] Trying to verify authenticity of KDC using principal HTTP/webserver.example.com@EXAMPLE.COM
[Wed Aug 27 07:23:04 2014] [debug] src/mod_auth_kerb.c(689): [client 192.168.122.1] krb5_rd_req() failed when verifying KDC
May 162014
 

I recently bought a PC Engines APU1C4 x86 embedded board which is meant to be the board for my future custom NAS box. In comparison to the various ARM boards it promises to be powerful and I/O friendly (3x Gbit LAN, SATA, 3x mini PCIe) and doesn’t include redundant graphics and sound circuits. On the other hand the only way to locally access it is via a serial terminal. Before installing the final system, hopefully more about this in a later article, I wanted to have a quick glance at the system from a Linux point of view. I tried booting the device over an USB stick prepared with my favorite live system SystemRescueCD, which by the way is based on Gentoo, but somehow failed as the boot process didn’t support output on a serial device and never spawned a terminal on it either. Before loosing too much time in searching for another media which would support a serial console, I simply setup my own minimal boot system based on Fedora 19. Here will follow a quick summary on what was required to achive this, as I couldn’t find a good and recent how-to about such a setup either. Because this minimal system is meant for ad-hoc booting only, I will keep things as simple as possible.

Prepare the installation medium

The APU1C4 supports booting over all possible storage devices, so you need to have a spare USB stick, external USB disk, mSATA disk, SATA disk or a SD card for storing the minimal Linux installation. Create at least one partition with a Linux file system of your choice on it and mount it. This will be the root directory of the new system. The following example will show how the setup is done on a device /dev/sdb with one partition mounted to /mnt/usbdisk:

host # mount /dev/sdb1 /mnt/usbdisk

Bootstrap minimal Fedora system in alternative root directory

Redhat-based distributions have an easy way to install a new system to an alternative root directory. Namely, it can be done with the main package manager yum. To keep it easy I used a Fedora 19 host system to setup the boot disk. While being in the context of the host system (below indicated with ‘host #‘), always be careful that your commands are actually modifying the content under /mnt/usbdisk. Otherwise you might have a bad surprise when you reboot your host system the next time.

1. Prepare RPM database:

host # mkdir -p /mnt/usbdisk/var/lib/rpm
host # rpm --root /mnt/usbdisk/var/lib/rpm --initdb

2. Install Fedora release package:

host # yumdownloader --destdir=/tmp fedora-release
host # rpm --root /mnt/usbdisk -ivh /tmp/fedora-release*rpm

3. Install a minimal set of packages (add whatever packages you’d like to have in the minimal system):

host # yum --installroot=/mnt/usbdisk install e2fsprogs kernel \
rpm yum grub2 openssh-client openssh-server passwd less rootfiles \
vim-minimal dhclient pciutils ethtool dmidecode

4. Copy DNS resolver configuration:

host # cp -p /etc/resolv.conf /mnt/usbdisk/etc

5. Mount pseudo file systems for chroot:

host # mount -t proc none /mnt/usbdisk/proc
host # mount -t sysfs none /mnt/usbdisk/sys
host # mount -o bind /dev /mnt/usbdisk/dev

5. chroot into the new system tree to finalize the installation:

host # chroot /mnt/usbdisk /bin/bash

6. Set root password

chroot # passwd

7. Prepare system configurations:

chroot # echo "NETWORKING=yes" > /etc/sysconfig/network

8. If you only have one partition with the entire system, a fstab is not needed anymore as dracut and Systemd will already know how to mount it. Otherwise create the fstab (use the UUID if you’re not sure how the disk will be called on the target system):

chroot # dumpe2fs -h /dev/sdb1 | grep UUID
dumpe2fs 1.42.7 (21-Jan-2013)
Filesystem UUID: bfb2fba1-774d-4cfc-a978-5f98701fe58a
chroot # cat << EOF >> /etc/fstab
UUID=bfb2fba1-774d-4cfc-a978-5f98701fe58a / ext4 defaults 0 1
EOF

9. Setup Grub 2 for serial console:

chroot # cat << EOF >> /etc/default/grub
GRUB_DEFAULT=0
GRUB_TIMEOUT=5
GRUB_DISTRIBUTOR="Fedora"
GRUB_CMDLINE_LINUX_DEFAULT=""
GRUB_CMDLINE_LINUX="console=ttyS0,115200n8 rd.lvm=0 rd.md=0 rd.dm=0 rd.luks=0 LANG=en_US.UTF-8 KEYTABLE=us"
GRUB_TERMINAL="serial"
GRUB_SERIAL_COMMAND="serial --unit=0 --speed=115200 --word=8 --parity=no --stop=1"
GRUB_DISABLE_OS_PROBER=true
EOF
chroot # grub2-install /dev/sdb
chroot # grub2-mkconfig -o /boot/grub2/grub.cfg

10. We’re done. Exit the chroot and unmount it:

chroot # exit
host # umount /mnt/usbdisk/dev
host # umount /mnt/usbdisk/proc
host # umount /mnt/usbdisk/sys
host # umount /mnt/usbdisk

Now you can remove the disk from the host and connect it with the embedded board you want to boot.

Connect to the serial console and start the system

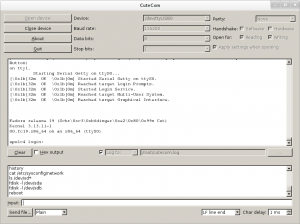
For connecting to the embedded board a USB to serial adapter and a null modem cable is required. There exist a number of tools to connect to a serial console on Linux which you probably already know (e.g. screen or minicom). However, I always found them painful to use. The tool of my choice is called CuteCom and is a graphical serial terminal. After selecting the correct serial device (/dev/ttyUSB0 in my case) and baud rate, you can power on your device and you’ll hopefully be greeted by the boot messages of your board and the freshly installed Linux system:

CuteCom

If there is no output in the terminal make sure, you use null-modem cable or adapter and not a simple serial extension cable. Further check for the correct serial port device in your serial terminal configuration and play around with the baud rate.

Good luck and have fun with your embedded device. 🙂

May 042014
 

Since Google Reader shutdown its service in the middle of last year, Tiny Tiny RSS is one of the better alternatives that one could use for aggregating and reading RSS feeds. Next to the official Android app which unfortunately isn’t free of charge, there is an alternative called TTRSS-Reader which even supports offline synchronization. This combination makes me very happy. But one thing that bothered me since a while, was that subscribing to new feeds was very easy during the days of Google Reader. Today I finally figured out how to setup Firefox to automatically subscribe to a Tiny Tiny RSS instance.

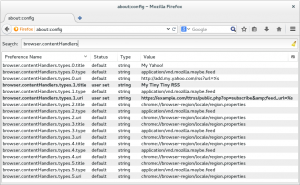
First go to the about:config page in your Firefox and search for the keys starting with browser.contentHandlers. Here we can configure a title and a URI which is later given as choice when subscribing to a feed. E.g:

  • browser.contentHandlers.types.1.title: My Tiny Tiny RSS
  • browser.contentHandlers.types.1.type: application/vnd.mozilla.maybe.feed
  • browser.contentHandlers.types.1.uri: URL of your TT-RSS instance

The subscriber URL for TT-RSS looks like the following. Of course you have to substitute the domain name with your domain:

https://example.com/ttrss/public.php?op=subscribe&feed_url=%s

At the end, the Firefox configuration should look similar to this screenshot:

Firefox-RSS-about:config

After the configuration is done, you have to restart Firefox. If you then browse to a Web site with a RSS feed and you click on it, the Firefox feed subscribtion page will appear. There you eventually can select the newly created entry for Tiny Tiny RSS:

Subscribe feed

After selecting the entry, you’ll be redirected to your Tiny Tiny RSS instance, where you can configure the feed settings such as category and more.

With this last piece of configuration, there is definitely nothing left anymore that makes me miss the time with Google Reader. 🙂

Apr 202014
 

Finally the day arrived, that I can say, I’m a Linux user since 10 years. On April 19 2004, I started my stage1 Gentoo Linux installation on my main workstation box. Since then, I changed my main desktop to Gnome, I adapted my work flow according to what’s possible with open source tools and I never looked back again to my old time with proprietary Windows tools.

However, I already made my first Linux experience a few years earlier than 2004. As far as I still remember, my first Linux distribution ever was SUSE Linux 7.0, which I was able to install without problems on an old computer of mine. I was kind of lost with this new concept that every small functionality is a program by itself, and why are these applications called so weird anyway? A bit later, I wanted to build a dedicated game and file server for LAN parties and it should run with an easy to maintain and lightweight alternative to Windows. The component that I was proud of the most in this server was a Promise SX4000 RAID controller which supported RAID5. I made sure that it was supporting Linux before buying it. At that time I learned the hard way, that Linux support doesn’t magically mean that the driver code is integrated into the upstream Linux kernel and therefore is supported by every Linux distribution. First, there were only some binary modules available, so my distribution for the server was Red Hat Linux 7.2. At that time RPMs were still some kind of annoying black magic to me, as there was no automated dependency resolving available by default. I didn’t know about yum which was optionally available already. Eventually, I never really could make the server work properly in the way how I imagined. Also, I learned from my geek friends, that there is Gentoo, which would be the best Linux distribution anyway. With Gentoo Linux I finally succeeded to install my RAID adapter and I started learning a basic principle, which I still think it’s true today: “If some open source software doesn’t work how you want, you simply don’t try hard enough”. I then also started using Gentoo on my Apple iBook G3, which released me from some Apple Java 1.4 Swing weirdness I experienced during the University programming exercises. These achievements showed me… Linux, ehmn Gentoo Linux, is the way to go. 🙂

You may wonder, why I still remember exactly when I originally setup my Gentoo workstation. Simply, because thanks of the rolling release model of Gentoo, I’m still running the same installation since then. I still have my emerge.log around with the entire update history since day one. You want some goodies?

  • First emerged package:
         Mon Apr 19 14:47:13 2004 >>> sys-apps/portage-2.0.50-r6
           merge time: 28 seconds.
    
  • Original toolchain:
         Mon Apr 19 15:00:50 2004 >>> sys-devel/binutils-2.14.90.0.7-r4
           merge time: 4 minutes and 45 seconds.
    
         Mon Apr 19 15:41:29 2004 >>> sys-devel/gcc-3.3.2-r5
           merge time: 39 minutes and 34 seconds.
    
         Mon Apr 19 16:09:44 2004 >>> sys-libs/glibc-2.3.2-r9
           merge time: 28 minutes.
    
  • Original desktop environment and browser:
         Tue Apr 20 14:51:33 2004 >>> x11-base/xfree-4.3.0-r5
           merge time: 17 minutes and 26 seconds.
    
         Wed Apr 21 02:10:24 2004 >>> gnome-base/gnome-2.4.2
           merge time: 3 seconds.
    
         Wed Apr 21 11:18:36 2004 >>> net-www/mozilla-firefox-0.8-r2
           merge time: 42 minutes and 9 seconds.
    

It’s really interesting to dig around in this file. As you can see, it took a few days to compile the entire system, but at the end, I had a system which satisfied my expectations and still serves me well today.

With help of the emerge.log, I can also make some interesting comparisons on how PC hardware evolved. Building OpenOffice.org back then on a single core AMD Athlon XP and LibreOffice today on a six core AMD Phenom II, which is also rather antique already:

     Thu Sep 23 23:56:56 2004 >>> app-office/openoffice-1.1.2
       merge time: 6 hours, 18 minutes and 15 seconds.

     Sun Feb  9 11:35:57 2014 >>> app-office/libreoffice-4.1.4.2
       merge time: 1 hour, 2 minutes and 32 seconds.

If you are interested in more details of my Gentoo emerge history or if you know some tools to automatically analyze or graph the emerge.log, please leave me a comment below.

So how did I evolve during the last 10 years using Linux? I became an IT professional for Linux engineering, I was witnessing how open source software was gaining acceptance in the most conservative IT environments on one side and driving innovation and efficiency on the other side. This wouldn’t have been possible without Gentoo, which taught me to dig into documentation and community reports to solve the problems. A big thanks to Gentoo and the entire Linux and open source community for all their support and motivation! I had a great time with you for the last 10 years. At the beginning, I could have never imagined that today the majority of people are running a Linux-based mobile phone or that Linux is evolving so rapidly as gaming platform. I’m looking forward to the next 10 years with Linux and open source software…

Dec 052013
 

There already exist many tutorials how to setup a basic IPv6 network environment on Linux. Most of the time they are limited to an example of a radvd.conf enabling Router Advertisement and Stateless Address Auto Configuration (SLAAC), an example how to configure BIND to serve DNS requests for AAAA records and reply to IPv6 reverse lookups. Sometimes even DHCPv6 is mentioned as an alternative way to assign IPv6 client addresses, but mostly with a very basic example configuration without fixed address assignments. Building on this basic knowledge, I want to summarize some further settings which might be interesting, when playing around with DHCPv6 in a Linux environment.

radvd and DHCPv6

As I’ve already mentioned earlier there is no way around radvd, at least if your router is based on Linux. Unlike with IPv4, in IPv6 the router can announce its presence with ICMPv6 Router Advertisement messages, triggered by radvd. By default these messages include the ‘Autonomous’ flag, which enables SLAAC and therefore ask a receiver to autonomously configure its address based on the given IPv6 prefix. In a DHCPv6 subnet you may want to disable this behaviour in the radvd.conf with the following prefix option:

AdvAutonomous off;

There are two more radvd.conf configuration directives which are important in a DHCPv6 setup:

AdvManagedFlag on;
AdvOtherConfigFlag on;

The ManagedFlag option (M flag) will hint the receiver to obtain a stateful address via DHCPv6. The OtherConfigFlag option (O flag) is used to inform the receiver that various other configuration information such as DNS, SIP or NTP server address lists can be requested via DHCPv6. The latter is often also used together with SLAAC, in case a client doesn’t understand RDNSS and DNSSL announcements.

Important: Not all IPv6 clients can handle address assignment if SLAAC is disabled! According to the RFC4294 (IPv6 Node Requirement), a IPv6 client must only support address auto-configuration via SLAAC. DHCPv6 may be supported optionally. Especially Windows XP but also Google Android (see Issue #32621) won’t be able to auto-configure a routable IPv6 address without SLAAC.

Another interesting radvd option not directly related to DHCPv6, but helpful if you like to analyse your network traffic without being distracted by all the Router Advertisement noise is the following interface option:

UnicastOnly on;

This will prevent radvd from broadcasting Router Advertisements and only reply with a unicast message if it receives a Router Solicitation message from a IPv6 host refreshing its routing table. Together with the possibility to only respond to a predefined list of host IPs in the radvd.conf, its even possible to run your router in complete stealth mode towards unknown IPv6 clients:

clients {
    fd41:3fb2:3196:b1bb:52b:4dc0:1631:6626;
    fd41:3fb2:3196:b1bb:9d4a:23c:bff:fe08;
};

radvd and ip6tables

To protect the router you may want to enable ip6tables. Additionally to the default ICMPv6 messages, such as Neighbor Solicitation/Advertisement and Destination Unreachable, which should be allowed on every IPv6 host anyway, the following rules must be configured to whitelist the radvd communication channels:

Allow incoming Router Solicitation (ICMPv6 Type 133) messages:

ip6tables -A INPUT -i <netdevice> -p ipv6-icmp -m icmp6 \
    --icmpv6-type router-solicitation -j ACCEPT

Allow outgoing Router Advertisement (ICMPv6 Type 134) messages:

ip6tables -A OUTPUT -o <netdevice> -p ipv6-icmp -m icmp6 \
    --icmpv6-type router-advertisement -j ACCEPT

That’s it for the moment. In part 2 of my DHCPv6 series, I’ll show you some interesting Linux DHCP server configuration directives. Stay tuned and don’t hesitate to leave a comment in case this article was helpful for you or if I got it all wrong… 😉

May 012013
 

Since a while, I always wanted to dig into RPM packaging as it would be very useful in my daily work with several hundreds of Red Hat machines. But I didn’t find a challenging software to package since it’s hard to find popular tools not available as RPM or at least SRPM already. This lasted until recently when I had to update Oracle JRockit Java, an enterprise JDK used with the Oracle Weblogic server, on multiple dozens of machines. Accurately defined the default installation of the JDK consists of only one folder which could be tar’ed and copied over, but a real Linux admin knows, this is not the way to install software. After several days of try and error and researching JVM packaging, the result is now available on my GitHub profile.

Download Spec File and Oracle JRockit Installer

The easiest way to get the .spec file is to clone the oracle-jrockit-rpm repository:

[user@host ~]$ git clone https://github.com/ganto/oracle-jrockit-rpm.git

The following files from the repository are then required to build the RPM:

oracle-jrockit-rpm/SOURCES/jrockit-silent.xml
oracle-jrockit-rpm/SPECS/java-1.6.0-jrockit.spec

Also download the Oracle JRockit installer, the x64 and ia32 version is supported by the spec file, and place it into the oracle-jrockit-rpm/SOURCES directory.

Use mock to build the RPMs

Mock is a useful tool to build RPMs for various target platforms. Even for the Gentoo friends it is available in the portage.

In the first step a chroot environment for the target distribution has to be setup. Mock already comes with a fair number of different definition files for different distributions, which can be found in /etc/mock. They can be adapted according to different requirements, e.g. when a local mirror or a different base set of packages should be used. When building RPMs for RHEL/CentOS 6, I had to modify the epel-6-x86_64.cfg to use the following setup command:

config_opts['chroot_setup_cmd'] = 'install bash bzip2 coreutils cpio diffutils findutils gawk gcc grep sed gcc-c++ gzip info patch redhat-rpm-config rpm-build shadow-utils tar unzip util-linux-ng which make'

After adding the unprivileged build user to the ‘mock’ group, the chroot can be initialized with the following command. In this example I want to build the RPMs for the already mentioned RHEL/CentOS 6 distributions:

[user@host ~]$ mock -r epel-6-x86_64 --init

Next, the SRPM needs to be packaged:

[user@host ~]$ mock -r epel-6-x86_64 --buildsrpm --spec oracle-jrockit-rpm/SPECS/java-1.6.0-jrockit.spec --sources oracle-jrockit-rpm/SOURCES

Eventually, the final RPMs can be compiled:

[user@host ~]$ mock -r epel-6-x86_64 --rebuild /var/lib/mock/epel-6-x86_64/root/builddir/build/SRPMS/java-1.6.0-jrockit-1.6.0.37_R28.2.5_4.1.0-1.el6.src.rpm

If everything went well, the final RPMs can be found under /var/lib/mock/epel-6-x86_64/root/builddir/build/RPMS:

[user@host ~]$ ls -1 /var/lib/mock/epel-6-x86_64/root/builddir/build/RPMS
java-1.6.0-jrockit-1.6.0.37_R28.2.5_4.1.0-1.el6.x86_64.rpm
java-1.6.0-jrockit-demo-1.6.0.37_R28.2.5_4.1.0-1.el6.noarch.rpm
java-1.6.0-jrockit-devel-1.6.0.37_R28.2.5_4.1.0-1.el6.x86_64.rpm
java-1.6.0-jrockit-jdbc-1.6.0.37_R28.2.5_4.1.0-1.el6.x86_64.rpm
java-1.6.0-jrockit-missioncontrol-1.6.0.37_R28.2.5_4.1.0-1.el6.x86_64.rpm
java-1.6.0-jrockit-src-1.6.0.37_R28.2.5_4.1.0-1.el6.x86_64.rpm

Final Thoughts

Of course this guide can be used to build any RPM also from other spec files and for other distributions. With these notes, I hope to be more productive when an RPM quickly has to be compiled in the future.

If you find a bug in the spec file, feel free to open an issue on GitHub, so I can fix and learn from it. Otherwise just leave a comment below if you think this guide or the spec file was useful.

Dec 022012
 

FreeIPA is an integrated user, host and service identity management solution combining 389 Directory Server (LDAP), MIT Kerberos, a BIND DNS server and the Dogtag Certificate Authority service with a simple but powerful Web GUI and an extensive command line interface for easy administration. It claims to become something like an Active Directory for Linux and Unix environments and is heavily pushed by Red Hat, which also integrates it as IPA server in their Red Hat Enterprise Linux distribution. A nice overview can be found in this presentation.

After having the pleasure of playing around with the Red Hat IPA server on RHEL and CentOS for the past few weeks, I also wanted to use this excellent identity management platform with my Gentoo Linux boxes. Some years ago, a bug report was opened in the Gentoo bugzilla (#297665), to coordinate the inclusion of FreeIPA in Gentoo. Andreis Vinogradovs, another Gentoo user, then started an effort, to write some of the necessary ebuilds for building FreeIPA, however they are still far from complete and therefore haven’t made it into the official Gentoo repository yet. This means that FreeIPA is unfortunately still not fully available for Gentoo.

Based on Andreis’ work, I started another effort, to update and polish the FreeIPA ebuild and its dependencies, so that they can be used on a Gentoo Linux box. The server part has dozens of dependencies not yet officially integrated in Gentoo, and the available ebuilds are mostly outdated, so I haven’t put too much effort yet into integrating the server parts on Gentoo. Especially the entire PKI infrastructure is still missing.

However, I succeeded to configure a Gentoo box as full-featured FreeIPA client, including OpenRC support for `authconfig` and `ipa-client-install`. I also found and reported some bugs in official Gentoo ebuilds (#445394, #445478), where you have to work-around in case you try out the setup yourself.

Of course you are curious now, where you can find the ebuilds. Because the work on them and especially the testing is still ongoing, I created a repository on Github so that everybody who is interested can have a look at ebuilds and provide constructive feedback in terms of pull requests.

I’m especially looking for people who would like to try the FreeIPA client with a Gentoo systemd or/and a hardened SELinux system.

How can you test the FreeIPA client on your Gentoo box?

You have to begin with setting up a (Free)IPA server, which is currently only possible on a Red Hat-based distribution. The easiest way is to setup a CentOS 6 VM, then run:

[root@centos6 ~]# yum install ipa-server
[root@centos6 ~]# ipa-server-install

More information can be found in the upstream installation guide.

Then add the ‘freeipa-overlay’ to the layman configuration of your Gentoo client. How you do this is described here.

ATTENTION: This guide is meant to be for experimental testing only. Don’t do this on your workstation if you are not familiar with FreeIPA and its technologies. I don’t take any responsibility if you blow up your machine. You have been warned!

Finally you are ready to emerge FreeIPA. Make sure tho have a look at the various
USE flags. They don’t have too much influence on build-time functionality but
on run-time dependencies. So you can slim down your installation in case you
already know, that you don’t need another DNS server or winbind support for
example. Set the ‘minimal’ USE flag for only building the IPA client
(Update 07.12.2012: This USE flag was replaces with ‘server’, so the client will be installed by default):

gentoo ~ # emerge -av freeipa

Some keyword unmasking may be required when you run a stable Gentoo installation.

Before you can start your IPA client installation, you have to make sure, that an empty NSS certificate database exists. This is expected to be under /etc/pki/nssdb. Gentoo however puts all the SSL stuff under /etc/ssl. I solved this by creating a symlink:

gentoo ~ # ln -s ssl /etc/pki
gentoo ~ # certutil -N -d /etc/pki/nssdb

Eventually the IPA client can be configured. E.g.:

gentoo ~ # ipa-client-install --mkhomedir --no-dns-sshfp
Discovery was successful!
Hostname: gentoo.example.com
Realm: EXAMPLE.COM
DNS Domain: example.com
IPA Server: centos6.example.com
BaseDN: dc=example,dc=com

Continue to configure the system with these values? [no]: yes
User authorized to enroll computers: admin
Synchronizing time with KDC...
Password for admin@EXAMPLE.COM:

Enrolled in IPA realm EXAMPLE.COM
Created /etc/ipa/default.conf
Domain example.com is already configured in existing SSSD config, creating a new one.
The old /etc/sssd/sssd.conf is backed up and will be restored during uninstall.
Configured /etc/sssd/sssd.conf
Configured /etc/krb5.conf for IPA realm EXAMPLE.COM
SSSD enabled
Configured /etc/openldap/ldap.conf
NTP enabled
Configured /etc/ssh/ssh_config
Warning: Installed OpenSSH server does not support dynamically loading
authorized user keys. Public key authentication of IPA users
will not be available.
Configured /etc/ssh/sshd_config
Client configuration complete.

That’s it! Your system is now able to use user accounts created on the IPA server. Check it with:

gentoo ~ # id admin
uid=155960000(admin) gid=155960000(admins) groups=155960000(admins)

As you can see in the generated /etc/pam.d/system-auth, pam_unix will be checked before pam_sssd. This means your local user accounts still have precedence towards the IPA accounts.

Happy testing… 🙂