SuperMicro server mainboards often include a dedicated Baseband Management Controller (BMC) which offers out-of-band management of the server system. This is a dedicated embedded chip (Specifications) which allow to power cycle the machine, monitor hardware variables, update firmware, access the operating system console and much more. If you are used to big brand server systems, then you might be more familiar with the term iLO, which is the HP Integrated Lights-Out, or IMM, which is the IBM Integrated Management Module. The basic functionality is always comparable.
FreeIPMI Management Utility
A nice fact is, that most of these out-of-band management solutions support the Intelligent Platform Management Interface (IPMI) specification, which defines an interface for accessing the various functionalities from an operating system (OS) or the network (e.g. for monitoring or OS recovery). For Linux there exists GNU FreeIPMI which is a collection of powerful tools for accessing IPMI-compatible BMCs. It is available via default package manager on all major Linux distributions.
Linux Kernel Configuration
As mentioned before, on Linux there are two different ways to access the BMC via IPMI. The first way is directly from the host running on the board connected to the BMC. The connection is done via kernel modules. Make sure you have at least the ipmi_defintf and ipmi_si modules loaded. If your kernel doesn’t include this modules, you might need to add them to your kernel configuration. The corresponding settings can be found under:
Device Drivers --->
   Character Devices --->
      <M> IPMI top-level message handler --->
          [ ]   Generate a panic event to all BMCs on a panic (NEW)
          <M>   Device interface for IPMI (NEW)
          <M>   IPMI System Interface handler (NEW)
          <M>   IPMI SMBus handler (SSIF) (NEW)
          <M>   IPMI Watchdog Timer (NEW)
          <M>   IPMI Poweroff (NEW)
You can check if it’s working by invoking ipmi-detect which should then output something like this:
# ipmi-locate
Probing KCS device using DMIDECODE... done
IPMI Version: 2.0
IPMI locate driver: DMIDECODE
IPMI interface: KCS
BMC driver device:
BMC I/O base address: 0xCA2
Register spacing: 1

Probing SMIC device using DMIDECODE... FAILED

Probing BT device using DMIDECODE... FAILED

Probing SSIF device using DMIDECODE... FAILED

Probing KCS device using SMBIOS... done
IPMI Version: 2.0
IPMI locate driver: SMBIOS
IPMI interface: KCS
BMC driver device:
BMC I/O base address: 0xCA2
Register spacing: 1

Probing SMIC device using SMBIOS... FAILED

Probing BT device using SMBIOS... FAILED

Probing SSIF device using SMBIOS... FAILED

[...]
There was an IPMI 2.0 compatible chip found, so we are good to go.
Network Configuration
The second way to connect via IPMI to the BMC is over the network. For this, there often is a dedicated network port on the mainboard that obviously needs to be connected to a network switch over which you can access it. By default the SuperMicro BMC is configured to get an IP address via DHCP. If the local IPMI connection is working, you can get the IP address by executing:
# ipmi-config --checkout --section Lan_Conf

#
# Section Lan_Conf Comments
#
# In the Lan_Conf section, typical networking configuration is setup. Most users
# will choose to set "Static" for the "IP_Address_Source" and set the
# appropriate "IP_Address", "MAC_Address", "Subnet_Mask", etc. for the machine.
#
Section Lan_Conf
        ## Possible values: Unspecified/Static/Use_DHCP/Use_BIOS/Use_Others
        IP_Address_Source                             Use_DHCP
        ## Give valid IP address
        IP_Address                                    192.168.1.15
        ## Give valid MAC address
        MAC_Address                                   0C:C4:7A:73:18:4F
        ## Give valid Subnet Mask
        Subnet_Mask                                   255.255.255.0
        ## Give valid IP address
        Default_Gateway_IP_Address                    192.168.1.1
        ## Give valid MAC address
        Default_Gateway_MAC_Address                   00:0D:B9:22:15:A2
        ## Give valid IP address
        Backup_Gateway_IP_Address                     0.0.0.0
        ## Give valid MAC address
        Backup_Gateway_MAC_Address                    00:00:00:00:00:00
EndSection
Otherwise you might need to search the DHCP server log for an entry, which IP address was given to the BMC. I recommend to set the BMC IP address to a fixed value, to minimize the risk to loose connectivity in case of major data center issue. This can be done via Web interface at e.g. https://192.168.1.15 or via ipmi-config:
# ipmi-config --commit -e Lan_Conf:IP_Address_Source=Static
# ipmi-config --commit -e Lan_Conf:IP_Address=192.168.1.42
Alternatively you can write the configuration in file and commit it with the --filename argument. E.g. create a static-network.conf:
# Static network configuration for the BMC
Section Lan_Conf
        IP_Address_Source                             Static
        IP_Address                                    192.168.1.42
EndSection
Unfortunately the IP_Address_Source key cannot be changed concurrently with other Lan_Conf keys. So we had to run the commit command twice, when specifying the new values on the command line and the same is true with the configuration file option. The first time it will set the IP_Address_Source:
# ipmi-config --commit --filename=static-network.conf
And the second time, it will set the new IP_address:
# ipmi-config --commit --filename=static-network.conf
However, this is an exception and most other key/value pairs can be changed concurrently. See the ipmi-config(8) man-page for more details.
Eventually we can check if the IPMI interface is reachable via network. This can be done with the ipmi-ping tool. If the --verbose argument is added, it will even output some information about the configured authentication settings. E.g.:
# ipmi-ping --count 1 --verbose 192.168.1.42
ipmi-ping 192.168.1.42 (192.168.1.42)
response received from 192.168.1.42: rq_seq=23, auth: none=clear md2=set md5=set password=set oem=clear anon=clear null=clear non-null=set user=clear permsg=clear
--- ipmi-ping 192.168.1.42 statistics ---
1 requests transmitted, 1 responses received in time, 0.0% packet loss
Configure Serial-over-LAN (SoL) Console Access
A neat feature of a BMC is the ability to remotely access the Linux console even when the regular network connection to the server is not working any more. However, this needs some additional configuration in the operating system.
Check SoL Settings in BIOS
First, we will check the BIOS settings to make sure the SoL feature is enabled. Note that accessing the BIOS usually already works in the default configuration, so if you are adventurous, you can already connect over remote IPMI (for demonstration purpose I’ll use the default user ADMIN):
$ ipmi-console -h 192.168.1.42 -u ADMIN -P
By default you won’t have access to the Linux system yet, so reboot the system via SSH so the BIOS can be setup accordingly. Unfortunately, the IPMI console won’t show the system’s POST output, so you have to keep pressing the DEL button in the terminal with the open IPMI console until you see the BIOS main screen. Then go to Advanced -> Serial Port Console Redirection and make sure, the SOL Console Redirection is enabled. Also remember how many additional serial ports you have available for configuration in this menu. This will become important when selecting the correct console in the Linux configuration. E.g. my board only has one other serial port (COM1) available and for this one console redirection one mustn’t be enabled for SoL to work correctly.
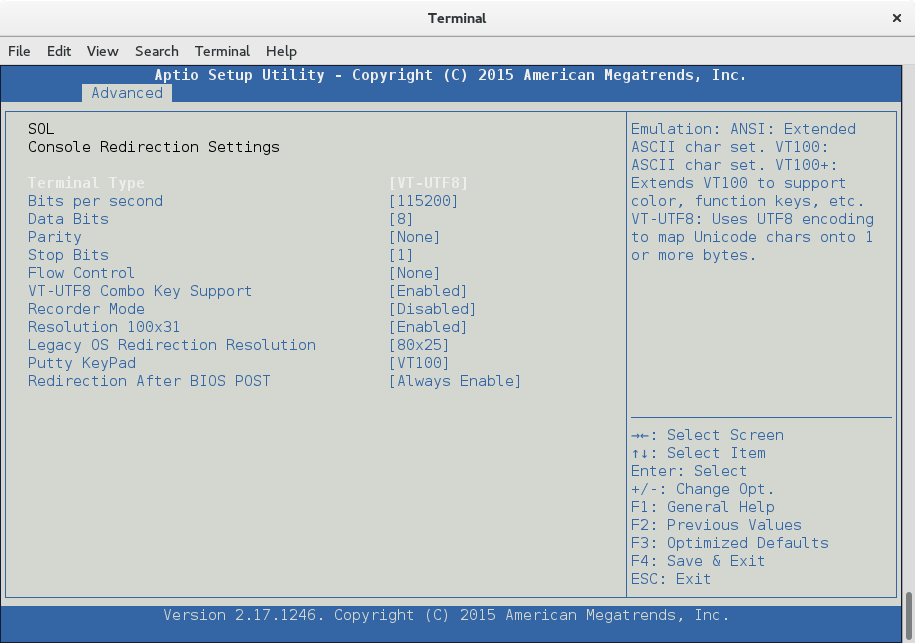
SuperMicro BIOS settings accessed via ipmi-console
If you want to see more verbose POST output, also disable Quiet Boot in the Advanced -> Boot Feature menu.
Leave the BIOS by pressing Save Changes and Reset. After a short while you should be greeted by the Grub menu. However, there won’t be any more output, as Linux doesn’t know yet, where to connect to the SoL console. To exit the IPMI console, you have to press &..
Setup Serial Console in Linux
If you have a systemd-based distribution all you need to do is to modify the kernel command line and add a serial console. Edit /etc/default/grub and extend the GRUB_CMDLINE_LINUX variable as following:
GRUB_CMDLINE_LINUX="rd.lvm.lv=vg00/swap rd.lvm.lv=vg00/slash rhgb quiet console=tty0 console=ttyS1,115200n8"
Important: This has to be /dev/ttyS1 in case the BIOS knows only knows one additional serial port (which would correspond to /dev/ttyS0). If you have two additional serial ports in the BIOS (COM1/COM2), you must set /dev/ttyS2 here. Don’t configure Grub 2 to output itself to the serial console, as this is still handled by the default SoL configuration forwarding the initial system output.
Regenerate the grub.cfg with:
# grub2-mkconfig -o /boot/grub2/grub.cfg
You might need to adjust the command and grub.cfg path according to your installation. The next time when the system is booted, the Linux system output will be available on the serial terminal and there will also be a login prompt. If you don’t have a systemd-based system, you additionally need to enable the serial console login terminal in the /etc/inittab. E.g.:
T1:23:respawn:/sbin/getty -L ttyS1 115200 vt100
Remotely Manage the System over IPMI
Now everything we need is in place. We can independently from the Linux operating system or the local system console:
- Configure the BMC via
ipmi-config(see above) - Access the Linux console via
ipmi-console - Query system sensor values (temperatures, voltages, …) via
ipmi-sensors - Query system event log via
ipmi-sel - Initiate system startup and power reset via
ipmi-power
Even tough I have the latest available IPMI firmware installed, it sometimes happened to me, that the SoL wouldn’t properly connect to the Linux console any more after I disconnected when being in the BIOS. Or that I could navigate through the BIOS but it wouldn’t refresh the screen. Unfortunately the only way that I found to fix this, was to reboot the BMC. Of course also this is possible over IPMI:
$ bmc-device -h 192.168.1.42 -u ADMIN -P --cold-reset
There are many other things that you can do via IPMI. Also there are other tools which can access IPMI-enabled BMCs. Another famous one is ipmitool. You might want to checkout Adam Sweet’s wiki on IPMI on Linux for more details how to use ipmitool. Personally, I prefer FreeIPMI for being a GNU project, being very intuitive to use and so far it worked perfectly well for everything I needed.
If you have some hints or additions, please leave a comment below. Thanks for reading.
Good article! Aaaah … made me think of the times I discovered that there was actually a second computer inside every server that worked independently and allowed me to do all the stuff that usually required a walk to the data center from my console. It was like magic.
I remember also that it was always very cumbersome to understand all the parts that are needed to make console redirection work in all stages of the system boot. Good explanation on that one.