Dec 122018
 

The first thing that someone would need when operating or playing around with OKD (better known as OpenShift) is a git version control service. Personally I’m a fan of Gitea and that’s why I’d like to show a way how to run Gitea in a OpenShift environment. Gitea upstream already provides a great container image which I’m are going to use. But as some of you may have already experienced, running an image on docker and running it in OpenShift is two different pairs of shoes. The fact that the Gitea image runs an integrated SSH server means that it doesn’t simply match the widely discussed Web application pattern. Therefore I’m trying to explain some of the difficulties that one might encounter when moving such an application to OpenShift.

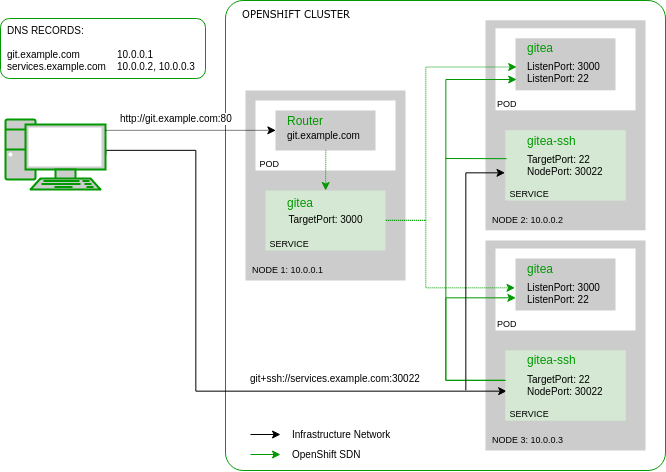
My environment consists of a multi-node OpenShift cluster. Obviously Gitea should be high available so that if a node goes down, one would still be able to access the git repositories. One pod is no pod, so Gitea must be deployed with a replica count of at least two. Accessing the pods over HTTP is already solved by the OpenShift default infrastructure via redundant HAProxy routers. I’d probably explain how to achieve a redundant router setup in one of my next blog posts but this time I’d like to emphasis on the Gitea SSH access via NodePort service feature. The following graphic shows a communication overview of such a setup:

NodePort Service

In OpenShift the Kubernetes Service resource is responsible for directing the traffic (TCP, UDP or SCTP) to the individual application pods. It maps the service name (e.g. ‘gitea’) via SkyDNS to a so-called ClusterIP. This is a virtual IP address that is not assigned to any host or container network interface but still used as packet destination within the cluster SDN (software defined network). After receiving a packet to this so-called ClusterIP the Linux kernel of an OpenShift node rewrites the packet destination to an IP address of an actual application pod and acts as a virtual network load-balancer.

In our example there is a ‘gitea’ service managing the HTTP traffic to port 3000 of the Gitea pod and a ‘gitea-ssh’ service managing the SSH traffic to port 22 of the Gitea pod. Because we can’t use the OpenShift Router as ingress for SSH, the ‘gitea-ssh’ service defines a special type called NodePort. This means that a packet sent to this port (e.g. 30022) on any OpenShift node will be received by the corresponding service and therefore forwarded to a Gitea pod. This is the simplest way how to direct non-HTTP traffic from outside of OpenShift to an application pod and can also be used for e.g. database protocols or Java RMI. Here the corresponding resource definition for the Gitea SSH service:

apiVersion: v1
kind: Service
metadata:
  name: gitea-ssh
spec:
  ports:
    - name: ssh
      nodePort: 30022
      port: 22
      protocol: TCP
      targetPort: 22
  selector:
    app: gitea
    deploymentconfig: gitea
  sessionAffinity: ClientIP
  type: NodePort

The sessionAffinity: ClientIP setting defines “sticky sessions” to avoid distributing multiple requests of the same client to different pods. I didn’t test yet, how SSH would behave without it, but I think it generally makes sense. In a running setup the service additionally shows the discussed ClusterIP which is statically assigned and the endpoints (pod IPs) which may change when pods are started and stopped:

$ oc describe service gitea-ssh
Name:                     gitea-ssh
Namespace:                vcs
Labels:                   app=gitea
                          template=gitea-persistent-template
Annotations:              
Selector:                 app=gitea,deploymentconfig=gitea
Type:                     NodePort
IP:                       172.30.8.9
Port:                     ssh  22/TCP
TargetPort:               22/TCP
NodePort:                 ssh  30022/TCP
Endpoints:                10.129.2.44:22,10.130.3.71:22
Session Affinity:         ClientIP
External Traffic Policy:  Cluster
Events:                   

From within the cluster, the Gitea SSH service can be reached via service name (extended with OpenShift project name, here ‘vcs’) DNS entry or directly via ClusterIP:

$ host gitea-ssh.vcs.svc
gitea-ssh.vcs.svc has address 172.30.8.9

$ ssh git@gitea-ssh.vcs.svc
PTY allocation request failed on channel 0
Hi there, You've successfully authenticated, but Gitea does not provide shell access.
If this is unexpected, please log in with password and setup Gitea under another user.
Connection to gitea-ssh.vcs.svc closed.

From outside the cluster, the Gitea SSH service can be reached via NodePort on any OpenShift node. To avoid a dependency on a single node in the git repository URL you can define multiple DNS entries using the same name (e.g. services.example.com) to all OpenShift node addresses:

$ host services.example.com
services.example.com has address 10.0.0.2
services.example.com has address 10.0.0.3

$ ssh -p 30022 git@services.example.com
PTY allocation request failed on channel 0
Hi there, You've successfully authenticated, but Gitea does not provide shell access.
If this is unexpected, please log in with password and setup Gitea under another user.
Connection to services.example.com closed.

Issues with NodePort

Port Assignment
The NodePort mechanism is allocating the corresponding port on each OpenShift node. To avoid a clash with node services such as the DNS resolver or the OpenShift node service the port range is restricted. It can be configured in the /etc/origin/master/master-config.yml with the option servicesNodePortRange and defaults to 30000-32767. Obviously multiple applications in the same cluster cannot use the same port and traffic to the chosen port must be allowed by the host firewall on the OpenShift nodes.

Node Groups
NodePorts are always allocated on every OpenShift cluster host running the node service which also includes the OpenShift master servers. OpenShift doesn’t provide a way to restrict the involved hosts to a subset. In my example I choose to restrict the hosts receiving traffic by only adding a limited number of nodes to the service DNS entry and block access on the others via iptables. If you don’t use an application load-balancer in front of the OpenShift routers you could also re-use the wildcard DNS entry defined for the HTTP traffic. The NodePort traffic would then follow the same path as the normal Web traffic.

Node Failure
If one OpenShift node goes down a client trying to access the Gitea SSH service might still try to connect to the unreachable host. Fortunately, the default SSH implementation used by the git command line client is quite tolerant and simply retries with another IP address. When testing this case I therefore haven’t experienced a major issue except a slight connection delay. The failure behavior might be different for other git clients or other application protocols altogether and is definitely not ideal but simple instead.

One way to improve this failure scenario would be to add a real TCP load-balancer in front of the NodePort but then there would be another piece of infrastructure that must be managed synchronously with the OpenShift infrastructure and which might be a new single point of failure.

Container with root Permissions

When starting the upstream Gitea container image in OpenShift you might likely encounter a startup failure with the following error message in the log:

s6-svscan: fatal: unable to mkfifo .s6-svscan/control: Permission denied

The Gitea image, and many other docker images not optimized for the pod concept introduced by Kubernetes, doesn’t start a single application process but a supervisor process (in this case s6) which then spawns multiple different application processes defined in /etc/s6. To do so it wants to create a FIFO in the /etc/s6/.s6-svscan directory which is only writable by the root user which fails as by default processes are started with a random unprivileged account.

Security Context Constraints

Unlike docker, OpenShift controls the actions a pod can do and access with a tight set of rules called Security Context Constraints (SCC). By default the ‘default’ ServiceAccount used to run the application pods is a member of the ‘restricted’ SCC which among other things defines the previously mentioned randomized UID. As Gitea won’t work like this, a less restrictive SCC must be used. After reading the documentation we find, that there is already a predefined SCC which grants us just enough permissions to start our container process as root user without weakening too many other restrictions. The SCC we are heading for is ‘anyuid’. Below I’ll present different approaches how this SCC can now be assigned to the Gitea deployment:

  • The OpenShift cluster administrator can add the ‘default’ ServiceAccount of a project to the list of users in the SCC definition. This doesn’t need any special configuration in the DeploymentConfig of the application but also grants every deployment in the corresponding project ‘anyuid’ privileges. In our setup this would be done with the following command, when assuming Gitea should be deployed in the ‘vcs’ project:
    $ oc adm policy add-scc-to-user anyuid system:serviceaccount:vcs:default
    

    I’m not in favor of this approach as it “hides” the additional permissions in the default ServiceAccount and prone to break the principle of least privilege by assigning the SCC to potentially more applications than necessary.

  • Another approach is using a dedicated ServiceAccount for the Gitea deployment and only adding that to the ‘anyuid’ SCC. The project owner can create a ServiceAccount with:
    $ oc create serviceaccount gitea
    

    The cluster administrator then has to add it to the SCC as before:

    $ oc adm policy add-scc-to-user anyuid system:serviceaccount:vcs:gitea
    

    In the DeploymentConfig the ServiceAccount must be referenced with a entry under the spec.template.spec key:

    $ oc patch dc/gitea --patch '{"spec":{"template":{"spec":{"serviceAccountName": "gitea"}}}}'
    

    The dedicated ServiceAccount used in this approach already hints that there might be special privileges connected to it and is in my opinion easier to audit. The disadvantage however is the more complex configuration.

  • Instead of adding every user account individually to the SCC a dedicated user group could be created having the SCC assigned to this group. Individual ServiceAcccountss would then be added to the group and therefore inherit the SCC. This would follow common practice in identity management to assign permissions to users via privilege groups. Additionally a group management role could be created which then would permit dedicated users not having the ‘cluster-admin’ privilege to manage the group membership.
  • Unfortunately I couldn’t figure out a true self-service model where a responsible project admin could expand the necessary permissions without the possibility to interfere with other projects. In the documentation of OpenShift (<=3.7) I found a hint that it is/was(?) possible to extend the default ServiceAccounts available after creating a new project by adding the account name (e.g. ‘anyuid-service-account’) to the serviceAccountConfig.managedNames list in /etc/origin/master/master-config.yml. While this configuration is still present in newer master-config.yml, the documentation is gone and I also didn’t find a way how to automatically add a user created like this to the ‘anyuid’ SCC. Maybe it’s possible by somehow modifying the project template. If you have done this before or at least have an idea how this could be done, please drop me a line.

At the end, the way how the ‘anyuid’ SCC is assigned to the Gitea application is unimportant as long as the application pod is allowed to start the s6 supervisor process with root permissions.

Gitea Application Template

The way how OpenShift administrators can provide an application setup ready for instantiation by OpenShift project owners is through Templates. Inspired by the My journey through Openshift blog post, I wanted to create my own Gitea template fixing some issues found in the original template and extending it with the opinionated configuration presented above. You can download it from here.

The template is able to automatically setup Gitea with exception of the ‘anyuid’ SCC configuration. It requires a persistent volume (PV) for storing the git repositories and some static configurations such as the SSH authorized_keys file. By default it will use a SQLite database backend which is also stored in the PV. Optionally you can also give the connection string and credentials of a PostgreSQL or MariaDB backend which can run on OpenShift or externally.

If you want the template to be available in the Service Catalog the YAML file has to be applied to the ‘openshift’ project by a cluster administrator:

$ oc create -f gitea-persistent-template.yaml -n openshift

Afterwards it can be instantiated by any project admin via Service Catalog Web-UI or from the command line via:

$ oc new-project vcs
$ oc new-app --template=gitea-persistent -p HTTP_DOMAIN=git.example.com -p SSH_DOMAIN=services.example.com

Alternatively, if no Service Catalog is available, or the template shouldn’t be loaded to OpenShift, the application can also be created directly from the YAML file via:

$ oc new-app -f gitea-persistent-template.yaml -p HTTP_DOMAIN=git.example.com -p SSH_DOMAIN=services.example.com

IMPORTANT: The template will configure Gitea to use a ServiceAccount named according to the parameter APPLICATION_NAME (defaults to ‘gitea’). It must be added to the ‘anyuid’ SCC as described above. E.g.:

$ oc adm policy add-scc-to-user anyuid system:serviceaccount:vcs:gitea

If you have some feedback regarding the template or troubles using it, please open a Github issue. Comments, corrections or general feedback to my article can be posted below. Thanks for reading.

Feb 152018
 

The recently disclosed Spectre and Meltdown CPU vulnerabilities are some of the most dramatic security issues in the recent computer history. Fortunately even six weeks after public disclosure sophisticated attacks exploiting these vulnerabilities are not yet common to observe. Fortunately, because the hard- and software vendors are still stuggling to provide appropriate fixes.

If you happen to run a Linux system, an excellent tool for tracking your vulnerability as well as the already active mitigation strategies is the spectre-meltdown-checker script originally written and maintained by Stéphane Lesimple.

Within the last month I set myself the target to bring this script to Fedora and EPEL so it can be easily consumed by the Fedora, CentOS and RHEL users. Today it finally happend that the spectre-meltdown-checker package was added to the EPEL repositories after it is already available in the Fedora stable repositories since one week.

On Fedora, all you need to do is:

dnf install spectre-meltdown-checker

After enabling the EPEL repository on CentOS this would be:

yum install spectre-meltdown-checker

The script, which should be run by the root user, will report:

    • If your processor is affected by the different variants of the Spectre and Meltdown vulnerabilities.
    • If your processor microcode tries to mitigate the Spectre vulnerability or if you run a microcode which
      is known to cause stability issues.
    • If your kernel implements the currently known mitigation strategies and if it was compiled with a compiler which is hardening it even more.
    • And eventually if you’re (still) affected by some of the vulnerability variants.
  • On my laptop this currently looks like this (Note, that I’m not running the latest stable Fedora kernel yet):

    # spectre-meltdown-checker                                                                                                                                
    Spectre and Meltdown mitigation detection tool v0.33                                                                                                                      
                                                                                                                                                                              
    Checking for vulnerabilities on current system                                       
    Kernel is Linux 4.14.14-200.fc26.x86_64 #1 SMP Fri Jan 19 13:27:06 UTC 2018 x86_64   
    CPU is Intel(R) Core(TM) i5-5200U CPU @ 2.20GHz                                      
                                                                                                                                                                              
    Hardware check                            
    * Hardware support (CPU microcode) for mitigation techniques                         
      * Indirect Branch Restricted Speculation (IBRS)                                    
        * SPEC_CTRL MSR is available:  YES    
        * CPU indicates IBRS capability:  YES  (SPEC_CTRL feature bit)                   
      * Indirect Branch Prediction Barrier (IBPB)                                        
        * PRED_CMD MSR is available:  YES     
        * CPU indicates IBPB capability:  YES  (SPEC_CTRL feature bit)                   
      * Single Thread Indirect Branch Predictors (STIBP)                                                                                                                      
        * SPEC_CTRL MSR is available:  YES    
        * CPU indicates STIBP capability:  YES                                           
      * Enhanced IBRS (IBRS_ALL)              
        * CPU indicates ARCH_CAPABILITIES MSR availability:  NO                          
        * ARCH_CAPABILITIES MSR advertises IBRS_ALL capability:  NO                                                                                                           
      * CPU explicitly indicates not being vulnerable to Meltdown (RDCL_NO):  UNKNOWN    
      * CPU microcode is known to cause stability problems:  YES  (Intel CPU Family 6 Model 61 Stepping 4 with microcode 0x28)                                                
                                              
    The microcode your CPU is running on is known to cause instability problems,         
    such as intempestive reboots or random crashes.                                      
    You are advised to either revert to a previous microcode version (that might not have
    the mitigations for Spectre), or upgrade to a newer one if available.                
    
    * CPU vulnerability to the three speculative execution attacks variants
      * Vulnerable to Variant 1:  YES 
      * Vulnerable to Variant 2:  YES 
      * Vulnerable to Variant 3:  YES 
    
    CVE-2017-5753 [bounds check bypass] aka 'Spectre Variant 1'
    * Mitigated according to the /sys interface:  NO  (kernel confirms your system is vulnerable)
    > STATUS:  VULNERABLE  (Vulnerable)
    
    CVE-2017-5715 [branch target injection] aka 'Spectre Variant 2'
    * Mitigated according to the /sys interface:  YES  (kernel confirms that the mitigation is active)
    * Mitigation 1
      * Kernel is compiled with IBRS/IBPB support:  NO 
      * Currently enabled features
        * IBRS enabled for Kernel space:  NO 
        * IBRS enabled for User space:  NO 
        * IBPB enabled:  NO 
    * Mitigation 2
      * Kernel compiled with retpoline option:  YES 
      * Kernel compiled with a retpoline-aware compiler:  YES  (kernel reports full retpoline compilation)
      * Retpoline enabled:  YES 
    > STATUS:  NOT VULNERABLE  (Mitigation: Full generic retpoline)
    
    CVE-2017-5754 [rogue data cache load] aka 'Meltdown' aka 'Variant 3'
    * Mitigated according to the /sys interface:  YES  (kernel confirms that the mitigation is active)
    * Kernel supports Page Table Isolation (PTI):  YES 
    * PTI enabled and active:  YES 
    * Running as a Xen PV DomU:  NO 
    > STATUS:  NOT VULNERABLE  (Mitigation: PTI)
    
    A false sense of security is worse than no security at all, see --disclaimer
    

    The script also supports a mode which outputs the result as JSON, so that it can easily be parsed by any compliance or monitoring tool:

    # spectre-meltdown-checker --batch json 2>/dev/null | jq
    [
      {
        "NAME": "SPECTRE VARIANT 1",
        "CVE": "CVE-2017-5753",
        "VULNERABLE": true,
        "INFOS": "Vulnerable"
      },
      {
        "NAME": "SPECTRE VARIANT 2",
        "CVE": "CVE-2017-5715",
        "VULNERABLE": false,
        "INFOS": "Mitigation: Full generic retpoline"
      },
      {
        "NAME": "MELTDOWN",
        "CVE": "CVE-2017-5754",
        "VULNERABLE": false,
        "INFOS": "Mitigation: PTI"
      }
    ]
    

    For those who are (still) using a Nagios-compatible monitoring system, spectre-meltdown-checker also supports to be run as NRPE check:

    # spectre-meltdown-checker --batch nrpe 2>/dev/null ; echo $?
    Vulnerable: CVE-2017-5753
    2
    

    I just mailed to Stéphane and he will soon release version 0.35 with many new features and fixes. As soon as it will be released I’ll submit a package update, so that you’re always up to date with the latest developments.

    Aug 282014
     

    Today I just found out, how super easy it is to setup a safe HTTP authentication via Kerberos with help of FreeIPA. Having the experience of managing a manually engineered MIT Kerberos/OpenLDAP/EasyRSA infrastructure, I’m once again blown away by the simplicity and usability of FreeIPA. I’ll describe with only a few commands which can be run within less than 10 minutes how it’s possible to setup a fully featured Kerberos-authenticated Web server configuration. Prerequisite is a FreeIPA server (a simple guide for installation can be found for example here) and a RedHat-based Web server host (RHEL, CentOS, Fedora).

    Required Packages:
    First we are going to install the required RPM packages:

    # yum install httpd mod_auth_kerb mod_ssl ipa-client

    Register the Web server host at FreeIPA:
    Make sure the Web server host is managed by FreeIPA:

    ipa-client-install --domain=example.com --server=ipaserver.example.com --realm=EXAMPLE.COM --mkhomedir --hostname=webserver.example.com --configure-ssh --configure-sshd

    Create a HTTP Kerberos Principal and install the Keytab:
    The Web server is identified in a Kerberos setup through a keytab, which has to be generated and installed on the Web server host. First make sure that you have a valid Kerberos ticket of a FreeIPA account with enough permissions (e.g. ‘admin’):

    # kinit admin
    # ipa-getkeytab -s ipaserver.example.com -p HTTP/webserver.example.com -k /etc/httpd/conf/httpd.keytab

    This will create a HTTP service principal in the KDC and install the corresponding keytab in the Apache httpd configuration directory. Just make sure that it can be read by the httpd server account:

    # chown apache /etc/httpd/conf/httpd.keytab

    Create a SSL certificate
    No need to fiddle around with OpenSSL. Requesting, signing and installing a SSL certificate with FreeIPA is one simple command:

    # ipa-getcert request -k /etc/pki/tls/private/webserver.key -f /etc/pki/tls/certs/webserver.crt -K HTTP/webserver.example.com -g 3072

    This will create a 3072 bit server key, generate a certificate request, send it to the FreeIPA Dogtag CA, sign it and install the resulting PEM certificate on the Web server host.

    Configure Apache HTTPS
    The httpd setup is the only and last configuration which needs to be done manually. For HTTPS set the certificate paths in /etc/httpd/conf.d/ssl.conf:

    [...]
    SSLCertificateFile /etc/pki/tls/certs/webserver.crt
    SSLCertificateKeyFile /etc/pki/tls/private/webserver.key
    SSLCertificateChainFile /etc/ipa/ca.crt
    

    Additionally do some SSL stack hardening (you may also want to read this):

    [...]
    SSLCompression off
    SSLProtocol all -SSLv2 -SSLv3 -TLSv1.0
    SSLHonorCipherOrder on
    SSLCipherSuite "EECDH+ECDSA+AESGCM EECDH+aRSA+AESGCM EECDH+ECDSA+SHA384 EECDH+ECDSA+SHA256 EECDH+aRSA+SHA384 EECDH+aRSA+SHA256 EECDH EDH+aRSA !aNULL !eNULL !LOW !3DES !MD5 !EXP !PSK !SRP !DSS !RC4"
    

    Kerberos HTTP Authentication:
    The final httpd authentication settings for ‘mod_auth_kerb‘ are done in /etc/httpd/conf.d/auth_kerb.conf or any vhost you want:

    <Location />
      SSLRequireSSL
      AuthType Kerberos
      AuthName "Kerberos Login"
      KrbMethodNegotiate On
      KrbMethodK5Passwd On
      KrbAuthRealms EXAMPLE.COM
      Krb5KeyTab /etc/httpd/conf/httpd.keytab
      require valid-user
    </Location>
    

    That’s it! After restarting the Web server you can login on https://webserver.example.com with your IPA accounts. If you don’t already have a valid Kerberos ticket in the Web client, KrbMethodNegotiate On enables interactive password authentication.

    Troubleshooting
    In case you get the following error message in the httpd error log, make sure the keytab exists and is readable by the httpd account (e.g. ‘apache’):

    [Wed Aug 27 07:23:04 2014] [debug] src/mod_auth_kerb.c(646): [client 192.168.122.1] Trying to verify authenticity of KDC using principal HTTP/webserver.example.com@EXAMPLE.COM
    [Wed Aug 27 07:23:04 2014] [debug] src/mod_auth_kerb.c(689): [client 192.168.122.1] krb5_rd_req() failed when verifying KDC
    
    May 012013
     

    Since a while, I always wanted to dig into RPM packaging as it would be very useful in my daily work with several hundreds of Red Hat machines. But I didn’t find a challenging software to package since it’s hard to find popular tools not available as RPM or at least SRPM already. This lasted until recently when I had to update Oracle JRockit Java, an enterprise JDK used with the Oracle Weblogic server, on multiple dozens of machines. Accurately defined the default installation of the JDK consists of only one folder which could be tar’ed and copied over, but a real Linux admin knows, this is not the way to install software. After several days of try and error and researching JVM packaging, the result is now available on my GitHub profile.

    Download Spec File and Oracle JRockit Installer

    The easiest way to get the .spec file is to clone the oracle-jrockit-rpm repository:

    [user@host ~]$ git clone https://github.com/ganto/oracle-jrockit-rpm.git

    The following files from the repository are then required to build the RPM:

    oracle-jrockit-rpm/SOURCES/jrockit-silent.xml
    oracle-jrockit-rpm/SPECS/java-1.6.0-jrockit.spec

    Also download the Oracle JRockit installer, the x64 and ia32 version is supported by the spec file, and place it into the oracle-jrockit-rpm/SOURCES directory.

    Use mock to build the RPMs

    Mock is a useful tool to build RPMs for various target platforms. Even for the Gentoo friends it is available in the portage.

    In the first step a chroot environment for the target distribution has to be setup. Mock already comes with a fair number of different definition files for different distributions, which can be found in /etc/mock. They can be adapted according to different requirements, e.g. when a local mirror or a different base set of packages should be used. When building RPMs for RHEL/CentOS 6, I had to modify the epel-6-x86_64.cfg to use the following setup command:

    config_opts['chroot_setup_cmd'] = 'install bash bzip2 coreutils cpio diffutils findutils gawk gcc grep sed gcc-c++ gzip info patch redhat-rpm-config rpm-build shadow-utils tar unzip util-linux-ng which make'

    After adding the unprivileged build user to the ‘mock’ group, the chroot can be initialized with the following command. In this example I want to build the RPMs for the already mentioned RHEL/CentOS 6 distributions:

    [user@host ~]$ mock -r epel-6-x86_64 --init

    Next, the SRPM needs to be packaged:

    [user@host ~]$ mock -r epel-6-x86_64 --buildsrpm --spec oracle-jrockit-rpm/SPECS/java-1.6.0-jrockit.spec --sources oracle-jrockit-rpm/SOURCES

    Eventually, the final RPMs can be compiled:

    [user@host ~]$ mock -r epel-6-x86_64 --rebuild /var/lib/mock/epel-6-x86_64/root/builddir/build/SRPMS/java-1.6.0-jrockit-1.6.0.37_R28.2.5_4.1.0-1.el6.src.rpm

    If everything went well, the final RPMs can be found under /var/lib/mock/epel-6-x86_64/root/builddir/build/RPMS:

    [user@host ~]$ ls -1 /var/lib/mock/epel-6-x86_64/root/builddir/build/RPMS
    java-1.6.0-jrockit-1.6.0.37_R28.2.5_4.1.0-1.el6.x86_64.rpm
    java-1.6.0-jrockit-demo-1.6.0.37_R28.2.5_4.1.0-1.el6.noarch.rpm
    java-1.6.0-jrockit-devel-1.6.0.37_R28.2.5_4.1.0-1.el6.x86_64.rpm
    java-1.6.0-jrockit-jdbc-1.6.0.37_R28.2.5_4.1.0-1.el6.x86_64.rpm
    java-1.6.0-jrockit-missioncontrol-1.6.0.37_R28.2.5_4.1.0-1.el6.x86_64.rpm
    java-1.6.0-jrockit-src-1.6.0.37_R28.2.5_4.1.0-1.el6.x86_64.rpm

    Final Thoughts

    Of course this guide can be used to build any RPM also from other spec files and for other distributions. With these notes, I hope to be more productive when an RPM quickly has to be compiled in the future.

    If you find a bug in the spec file, feel free to open an issue on GitHub, so I can fix and learn from it. Otherwise just leave a comment below if you think this guide or the spec file was useful.