I recently bought a PC Engines APU1C4 x86 embedded board which is meant to be the board for my future custom NAS box. In comparison to the various ARM boards it promises to be powerful and I/O friendly (3x Gbit LAN, SATA, 3x mini PCIe) and doesn’t include redundant graphics and sound circuits. On the other hand the only way to locally access it is via a serial terminal. Before installing the final system, hopefully more about this in a later article, I wanted to have a quick glance at the system from a Linux point of view. I tried booting the device over an USB stick prepared with my favorite live system SystemRescueCD, which by the way is based on Gentoo, but somehow failed as the boot process didn’t support output on a serial device and never spawned a terminal on it either. Before loosing too much time in searching for another media which would support a serial console, I simply setup my own minimal boot system based on Fedora 19. Here will follow a quick summary on what was required to achive this, as I couldn’t find a good and recent how-to about such a setup either. Because this minimal system is meant for ad-hoc booting only, I will keep things as simple as possible.
Prepare the installation medium
The APU1C4 supports booting over all possible storage devices, so you need to have a spare USB stick, external USB disk, mSATA disk, SATA disk or a SD card for storing the minimal Linux installation. Create at least one partition with a Linux file system of your choice on it and mount it. This will be the root directory of the new system. The following example will show how the setup is done on a device /dev/sdb with one partition mounted to /mnt/usbdisk:
host # mount /dev/sdb1 /mnt/usbdisk
Bootstrap minimal Fedora system in alternative root directory
Redhat-based distributions have an easy way to install a new system to an alternative root directory. Namely, it can be done with the main package manager yum. To keep it easy I used a Fedora 19 host system to setup the boot disk. While being in the context of the host system (below indicated with ‘host #‘), always be careful that your commands are actually modifying the content under /mnt/usbdisk. Otherwise you might have a bad surprise when you reboot your host system the next time.
1. Prepare RPM database:
host # mkdir -p /mnt/usbdisk/var/lib/rpm
host # rpm --root /mnt/usbdisk/var/lib/rpm --initdb
2. Install Fedora release package:
host # yumdownloader --destdir=/tmp fedora-release
host # rpm --root /mnt/usbdisk -ivh /tmp/fedora-release*rpm
3. Install a minimal set of packages (add whatever packages you’d like to have in the minimal system):
host # yum --installroot=/mnt/usbdisk install e2fsprogs kernel \
rpm yum grub2 openssh-client openssh-server passwd less rootfiles \
vim-minimal dhclient pciutils ethtool dmidecode
4. Copy DNS resolver configuration:
host # cp -p /etc/resolv.conf /mnt/usbdisk/etc
5. Mount pseudo file systems for chroot:
host # mount -t proc none /mnt/usbdisk/proc
host # mount -t sysfs none /mnt/usbdisk/sys
host # mount -o bind /dev /mnt/usbdisk/dev
5. chroot into the new system tree to finalize the installation:
host # chroot /mnt/usbdisk /bin/bash
6. Set root password
chroot # passwd
7. Prepare system configurations:
chroot # echo "NETWORKING=yes" > /etc/sysconfig/network
8. If you only have one partition with the entire system, a fstab is not needed anymore as dracut and Systemd will already know how to mount it. Otherwise create the fstab (use the UUID if you’re not sure how the disk will be called on the target system):
chroot # dumpe2fs -h /dev/sdb1 | grep UUID
dumpe2fs 1.42.7 (21-Jan-2013)
Filesystem UUID: bfb2fba1-774d-4cfc-a978-5f98701fe58a
chroot # cat << EOF >> /etc/fstab
UUID=bfb2fba1-774d-4cfc-a978-5f98701fe58a / ext4 defaults 0 1
EOF
9. Setup Grub 2 for serial console:
chroot # cat << EOF >> /etc/default/grub
GRUB_DEFAULT=0
GRUB_TIMEOUT=5
GRUB_DISTRIBUTOR="Fedora"
GRUB_CMDLINE_LINUX_DEFAULT=""
GRUB_CMDLINE_LINUX="console=ttyS0,115200n8 rd.lvm=0 rd.md=0 rd.dm=0 rd.luks=0 LANG=en_US.UTF-8 KEYTABLE=us"
GRUB_TERMINAL="serial"
GRUB_SERIAL_COMMAND="serial --unit=0 --speed=115200 --word=8 --parity=no --stop=1"
GRUB_DISABLE_OS_PROBER=true
EOF
chroot # grub2-install /dev/sdb
chroot # grub2-mkconfig -o /boot/grub2/grub.cfg
10. We’re done. Exit the chroot and unmount it:
chroot # exit
host # umount /mnt/usbdisk/dev
host # umount /mnt/usbdisk/proc
host # umount /mnt/usbdisk/sys
host # umount /mnt/usbdisk
Now you can remove the disk from the host and connect it with the embedded board you want to boot.
Connect to the serial console and start the system
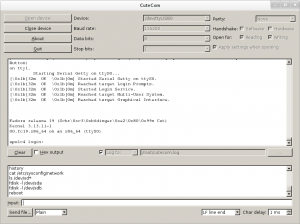
For connecting to the embedded board a USB to serial adapter and a null modem cable is required. There exist a number of tools to connect to a serial console on Linux which you probably already know (e.g. screen or minicom). However, I always found them painful to use. The tool of my choice is called CuteCom and is a graphical serial terminal. After selecting the correct serial device (/dev/ttyUSB0 in my case) and baud rate, you can power on your device and you’ll hopefully be greeted by the boot messages of your board and the freshly installed Linux system:
If there is no output in the terminal make sure, you use null-modem cable or adapter and not a simple serial extension cable. Further check for the correct serial port device in your serial terminal configuration and play around with the baud rate.
Good luck and have fun with your embedded device. 🙂
