Dec 202016
 

Since a long time I’m using and following the development of the LXC (Linux Container) project. I feel that it unfortunately never really had the success it deserved and in the recent years new technologies such as Docker and rkt pretty much redefined the common understanding of a container according to their own terms. Nonetheless LXC still claims its niche as full Linux operating system container solution especially suited for persistent pet containers, an area where the new players on the market are still in the stage of figuring out how to implement this properly according to their concept. LXC development hasn’t stalled, quite the contrary, they extended the API with a HTTP REST interface (served via Linux Container Daemon, LXD), implemented support for container live-migration, added container image management and much more. This means that there are a lot of reasons why someone, including me, would want to use Linux containers and LXD.

Enable LXD COPR repository
LXD is not officially packaged for Fedora. Therefore I spent the last few weeks by creating some community packages via their COPR build system and repository service. Similar to the better known Ubuntu PPA (Personal Package Archive) system, COPR provides a RPM package repository which can easily be consumed by Fedora users. To use the LXD repository, all you need to do is enabling it via dnf:

# dnf copr enable ganto/lxd

Please note that COPR packages are not reviewed by the Fedora package maintainers therefore you should only install packages where you trust the author. For this reason I also provide a Github repository with the RPM spec files, so that everyone could also build the RPMs on their own if they feel uncomfortable using the pre-built RPMs from the repository.

Install and start LXD
LXD is split into multiple packages. The important ones are lxd, the Linux Container Daemon and lxd-client, the LXD client binary called lxc. Install them with:

# dnf install lxd lxd-client

Unfortunately I didn’t had time to figure out the correct SELinux labels for LXD yet, therefore you need to disable SELinux prior to starting the daemon. LXD supports user namespaces to map the root user in a container to an unprivileged user ID on the container host. For this you need to assign an UID range on the host:

# echo "root:1000000:65536" >> /etc/subuid
# echo "root:1000000:65536" >> /etc/subgid

If you don’t do this, user namespaces won’t be used which is indicated by a message such as:

lvl=warn msg="Error reading idmap" err="User \"root\" has no subuids."
lvl=warn msg="Only privileged containers will be able to run"

Eventually start LXD with:

# systemctl start lxd.service

LXD configuration
LXD doesn’t have a configuration file. Configuration properties must be set and retrieved via client commands. Here you can find a list of all supported configuration properties. Most tutorials will suggest to initially run lxd init which would generate a basic configuration. However there is only a limited set of configuration options available via this command and therefore I prefer to set the properties via LXD client. A normal user account can be used to manage LXD via client when it’s a member of the lxd POSIX group:

# usermod --append --groups lxd myuser

By default LXD will store its images and containers in directories under /var/lib/lxd. Alternatives storage back-ends such as LVM, Btrfs or ZFS are available. Here I will show an example how to use LVM. Similar to the recommended Docker setup on Fedora it will use LVM thin volumes to store images and containers. First create a LVM thin pool. For this we still need some space available on the default volume group. Alternatively you can use a second disk with a dedicated volume group. Replace vg00 with the volume group name you want to use:

# lvcreate --size 20G --type thin-pool --name lxd-pool vg00

Now we set this thin pool as storage back-end in LXD:

$ lxc config set storage.lvm_vg_name vg00
$ lxc config set storage.lvm_thinpool_name lxd-pool

For each image which is downloaded LXD will create a thin volume storing the image. If a new container is instantiated a new writeable snapshot will be created from which you can create an image again or make further snapshots for fast roll-back. By default the container file system will be ext4. If you prefer XFS, it can be set with the following command:

$ lxc config set storage.lvm_fstype xfs

Also for networking various options are available. If you ran lxd init, you may have already created a lxdbr0 network bridge. Otherwise I will show you how to manually create one in case you want a dedicated container bridge or attach LXD to an already existing bridge which would be configured through an external DHCP server.

To create a dedicated network bridge where the traffic will be NAT‘ed to the outside, run:

$ lxc network create lxdbr0

This will create a bridge device with the given name and also start-up a dedicated instance of dnsmasq which will act as DNS and DHCP server for the container network.

A big advantage of LXD in comparison to plain LXC is a feature called container profiles. There you can define settings which should be applied to a new container instance. In our case, we now want containers to use the network bridge created before or any other network bridge which was created independently. For this it will be added to the “default” profile which is applied by default when creating a new container:

$ lxc network attach-profile lxdbr0 default eth0

The eth0 is the network device name which will be used inside the container. We could also add multiple network bridges or create multiple profiles (lxc profile create newprofile) with different network settings.

Create a container
Finally we have the most important pieces together to launch a container. A container is always instantiated from an image. The LXC projects provides an image repository with a big number of prebuilt container images pre-configured under the remote name images:. The images are regular LXC containers created via upstream lxc-create script using the various distribution templates. To list the available images run:

$ lxc image list images:

If you found an image you want to run, it can be started as following. Of course in my example I will use a Fedora 24 container (unfortunately there are no Fedora 25 containers available yet, but I’m also working on that):

$ lxc launch images:fedora/24 my-fedora-container

With the following command you can create a console session into the container:

$ lxc exec my-fedora-container /bin/bash

I hope this short guide made you curious to try LXD on Fedora. I’m glad to hear some feedback via comments or Email if you find this guide or the my COPR repository useful or if you have some corrections or found some issues.

Further reading
If you want to know more about how to use the individual features of LXD, I can recommend the how-to series of Stéphane Graber, one of the core developers of LXC/LXD:

Sep 232016
 

Currently, I’m working on automating the setup of a authoritative DNS server, namely gdnsd. There are many nice features in gdnsd, but what might be interesting for you, that it requires the zone data to be in the regular RFC1035 compliant format. This is also true for bind, probably the most widely used DNS server, therefore the approach explained here, could be also used for bind. Again I wanted to use Ansible as automation framework, not only to setup and configure the service, but also to generate the DNS zone file. One reason for this is, because gdnsd doesn’t support zone transfers, therefore Ansible should be used as synchronization mechanism and because in my opinion the JSON-based inventory format is a simple, generic but very powerful data interface. Especially when considering the dynamic inventory feature of Ansible, one is completely free where and how to actually store the configuration data.

There are already a number of Ansible bind roles available, however they mostly use a very simple approach when it’s about configuring the zone file and its serial. When generating zone files with an automation tool the trickiest part is the handling of the serial number, which has to be increased on every zone update. I’d like to explain what solutions I implemented to solve this challenge.

Zone data generation must be idempotent
One strength of Ansible is, that it can be run over and over again and only ever changes something in the system if the current state is not as desired. In my context this means, that the zone file only needs to be updated if the zone data from the inventory has changed. Therefore, also the serial number only ever has to be updated in that case. But how to know if the data has changed?

Using the powerful Jinja2 templating engine, I defined dictionary and assigned every value which would later go into the zone file. Then, I’ll create a checksum over the dictionary content and save it as comment into the zone file. If the checksum changed, the serial has to be updated. Otherwise the zone file includes the old serial and nothing changed. In practice this would look like this:

  1. Read the hash and serial which are saved as comment in the existing zone file and register a temporary variable. It will be empty if the zone file doesn’t exist yet:
    - name: Read zone hash and serial
      shell: 'grep "^; Hash:" /etc/gdnsd/zones/example.com || true'
      register: gdnsd__register_hash_and_serial
      [...]
    
  2. Define a task which will update the zone file:
    - name: Generate forward zones
      template:
        src: 'etc/gdnsd/zones/forward_zone.j2'
        dest: '/etc/gdnsd/zones/example.com'
        [...]
    
  3. In the template, create a dictionary holding the zone data:
    {% set _zone_data = {} %}
    {% set _ = _zone_data.update({'ttl': item.ttl}) %}
    {% set _ = _zone_data.update({'domain': 'example.com'}) %}
    [...]
    
  4. Create an intermediate variable _hash_and_serial holding the hash and serial read from the zone file before:
    {% set _hash_and_serial = gdnsd__register_hash_and_serial.stdout.split(' ')[2:] %}
    
  5. Create a hash from the final _zone_data dictionary, compare it with the hash (first element) in _hash_and_serial. If the hashes are equal set the serial as read before (second element) in _hash_and_serial. Otherwise set a new serial which was previously saved in gdnsd__fact_zone_serial (see following section):
    {% set _zone = {'hash': _zone_data | string | hash('md5')} %}
    {% if _hash_and_serial and _hash_and_serial[0] == _zone['hash'] %}
    {%   set _ = _zone.update({'serial': _hash_and_serial[1]}) %}
    {% else %}
    {%   set _ = _zone.update({'serial': gdnsd__fact_zone_serial}) %}
    {% endif %}
    
  6. Safe the final hash and serial as comment to the zone file:
    ; Hash: {{ _zone['hash'] }} {{ _zone['serial'] }}
    

Identical zone serial on distributed servers
I didn’t explain yet, how gdnsd__fact_zone_serial is defined. Initially, I simply had ansible_date_time.epoch, which corresponds the Unix time, assigned to the serial. This is the simplest way to make sure the serial is numerical and each zone update results in an increased value. However, in the introduction I also mentioned the issue of distributing the zone files between a set of DNS servers. Obviously, if they have the same zone data, they must also have the same serial.

To make sure multiple servers are using the same serial for a zone update, the serial is not computed individually in each template task execution, but once for each playbook run. In Ansible, one can specify that a task must only run once, even the playbook is executed on multiple servers. Therefore I defined such a task to store the Unix time in the temporary fact gdnsd__fact_zone_serial which is used in the zone template on all servers:

- name: Generate serial
  set_fact:
    gdnsd__fact_zone_serial: '{{ ansible_date_time.epoch }}'
  run_once: True

This approach is still not perfect. It won’t compare the two generated zone files between a set of servers. So you have to make sure that the zone data in the inventory is the same for all servers. Also, if you update the servers individually, the serial is generated twice and therefore are different, even when the zone data is identical. At the moment I can’t see any elegant approach to solve those issues. If you have some ideas, please let me know…

The example code listed above is a simplified version of my real code. If you are interested in the entire role, have a look at github.com: ganto/ansible-gdnsd. I hope this could give you some useful examples for using some of the more advanced Ansible features in a real-world scenario.

Sep 052016
 

Most of my readers must have heard about the “Let’s encrypt” public certificate authority (CA) by now. For those who haven’t: About two years ago, the Internet Security Research Group (ISRG), a public benefit group, supported by the Electronic Frontier Foundation (EFF), the Mozilla Foundation, Cisco, Akamai, the Linux Foundation and many more started the challenge to create a fully trusted public key infrastructure which can be used for free by everyone. Until then, the big commercial certificate authorities such as Comodo, Symantec, GlobalSign or GoDaddy dominated the market of SSL certificates which prevented a wide use of trusted encryption. The major goal of the ISRG is to increase the use of HTTPS for Web sites from then less than 40 percent two years ago to a 100 percent. One step to achieve this, is by providing certificates to everyone for free and the other step, to do this in a fully automated way. For this reason a new protocol called Advanced Certificate Management Environment (ACME) was designed and implemented. Going forward to today: The “Let’s encrypt” CA issued already more than five million certificates and the use of HTTPS is increasing to around 45 percent in June 2016.

acme-tiny is a small Python script which can be used to submit the certificate request to the “Let’s encrypt” CA. If you’re eligible to request a certificate for this domain you instantly get the certificate back. As such a certificate is only valid for 90 days and the renewal process doesn’t need any user interaction it’s a perfect opportunity for a fully automated setup.

Since a while I prefer Ansible for all kind of automation tasks. “Let’s encrypt” finally allows me to secure new services, which I spontaneously decide to host on my server via sub-domains. To ease the initial setup and fully automate the renewal process, I wrote an Ansible role ganto.acme_tiny. It will run the following tasks:

  • Generate a new RSA key if none is found for this domain
  • Create a certificate signing request
  • Submit the certificate signing request with help of acme-tiny to the “Let’s encrypt” CA
  • Merge the received certificate with the issuing CA certificate to a certificate chain which then can be configured for various services
  • Restart the affected service to load the new certificate

In practice, this would look like this:

  • Create a role variable file /etc/ansible/vars/mail.linuxmonk.ch.yml:
    acme_tiny__domain: [ 'mail.linuxmonk.ch', 'smtp.linuxmonk.ch' ]
    acme_tiny__cert_type: [ 'postfix', 'dovecot' ]
  • Make sure the involved service configurations load the certificate and key from the correct location (see ganto.acme_tiny: Service Configuration).
  • Run the playbook with the root user to do the initial setup:

    $ sudo ansible-playbook \
    -e @/etc/ansible/vars/mail.linuxmonk.ch.yml \
    /etc/ansible/playbooks/acme_tiny.yml

That’s it. Both SMTP and IMAP are now secured with help of a “Let’s encrypt” certificate. To setup automated certificate renewal I only have to add the executed command in a task scheduler such as cron from where it will be executed as unprivileged user acmetiny which was created during the initial playbook run. E.g. in /etc/cron.d/acme_tiny:

PATH=/usr/local/sbin:/usr/local/bin:/sbin:/bin:/usr/sbin:/usr/bin

@monthly acmetiny /usr/bin/ansible-playbook -e @/etc/ansible/vars/mail.linuxmonk.ch.yml /etc/ansible/playbooks/acme_tiny.yml >/dev/null

If you became curious and want to have a setup like this yourself, checkout the extensive documentation about the Ansible role at Read the Docs: ganto.acme_tiny.

This small project was also a good opportunity for me, to integrate all the nice free software-as-a-service offers the Internet is providing for a (Ansible role) developer nowadays:

  • The code “project” is hosted and managed on Github.
  • Every release and pull request is tested via the Travis-CI continuous integration platform. It makes use of the rolespec Ansible role testing framework for which a small test suite has been written.
  • Ansible Galaxy is used as a repository for software distribution.
  • The documentation is written in a pimped version of Markdown, rendered via Sphinx and hosted on Read the Docs from where it can be accessed and downloaded in various formats.

That’s convenient!

Aug 282014
 

Today I just found out, how super easy it is to setup a safe HTTP authentication via Kerberos with help of FreeIPA. Having the experience of managing a manually engineered MIT Kerberos/OpenLDAP/EasyRSA infrastructure, I’m once again blown away by the simplicity and usability of FreeIPA. I’ll describe with only a few commands which can be run within less than 10 minutes how it’s possible to setup a fully featured Kerberos-authenticated Web server configuration. Prerequisite is a FreeIPA server (a simple guide for installation can be found for example here) and a RedHat-based Web server host (RHEL, CentOS, Fedora).

Required Packages:
First we are going to install the required RPM packages:

# yum install httpd mod_auth_kerb mod_ssl ipa-client

Register the Web server host at FreeIPA:
Make sure the Web server host is managed by FreeIPA:

ipa-client-install --domain=example.com --server=ipaserver.example.com --realm=EXAMPLE.COM --mkhomedir --hostname=webserver.example.com --configure-ssh --configure-sshd

Create a HTTP Kerberos Principal and install the Keytab:
The Web server is identified in a Kerberos setup through a keytab, which has to be generated and installed on the Web server host. First make sure that you have a valid Kerberos ticket of a FreeIPA account with enough permissions (e.g. ‘admin’):

# kinit admin
# ipa-getkeytab -s ipaserver.example.com -p HTTP/webserver.example.com -k /etc/httpd/conf/httpd.keytab

This will create a HTTP service principal in the KDC and install the corresponding keytab in the Apache httpd configuration directory. Just make sure that it can be read by the httpd server account:

# chown apache /etc/httpd/conf/httpd.keytab

Create a SSL certificate
No need to fiddle around with OpenSSL. Requesting, signing and installing a SSL certificate with FreeIPA is one simple command:

# ipa-getcert request -k /etc/pki/tls/private/webserver.key -f /etc/pki/tls/certs/webserver.crt -K HTTP/webserver.example.com -g 3072

This will create a 3072 bit server key, generate a certificate request, send it to the FreeIPA Dogtag CA, sign it and install the resulting PEM certificate on the Web server host.

Configure Apache HTTPS
The httpd setup is the only and last configuration which needs to be done manually. For HTTPS set the certificate paths in /etc/httpd/conf.d/ssl.conf:

[...]
SSLCertificateFile /etc/pki/tls/certs/webserver.crt
SSLCertificateKeyFile /etc/pki/tls/private/webserver.key
SSLCertificateChainFile /etc/ipa/ca.crt

Additionally do some SSL stack hardening (you may also want to read this):

[...]
SSLCompression off
SSLProtocol all -SSLv2 -SSLv3 -TLSv1.0
SSLHonorCipherOrder on
SSLCipherSuite "EECDH+ECDSA+AESGCM EECDH+aRSA+AESGCM EECDH+ECDSA+SHA384 EECDH+ECDSA+SHA256 EECDH+aRSA+SHA384 EECDH+aRSA+SHA256 EECDH EDH+aRSA !aNULL !eNULL !LOW !3DES !MD5 !EXP !PSK !SRP !DSS !RC4"

Kerberos HTTP Authentication:
The final httpd authentication settings for ‘mod_auth_kerb‘ are done in /etc/httpd/conf.d/auth_kerb.conf or any vhost you want:

<Location />
  SSLRequireSSL
  AuthType Kerberos
  AuthName "Kerberos Login"
  KrbMethodNegotiate On
  KrbMethodK5Passwd On
  KrbAuthRealms EXAMPLE.COM
  Krb5KeyTab /etc/httpd/conf/httpd.keytab
  require valid-user
</Location>

That’s it! After restarting the Web server you can login on https://webserver.example.com with your IPA accounts. If you don’t already have a valid Kerberos ticket in the Web client, KrbMethodNegotiate On enables interactive password authentication.

Troubleshooting
In case you get the following error message in the httpd error log, make sure the keytab exists and is readable by the httpd account (e.g. ‘apache’):

[Wed Aug 27 07:23:04 2014] [debug] src/mod_auth_kerb.c(646): [client 192.168.122.1] Trying to verify authenticity of KDC using principal HTTP/webserver.example.com@EXAMPLE.COM
[Wed Aug 27 07:23:04 2014] [debug] src/mod_auth_kerb.c(689): [client 192.168.122.1] krb5_rd_req() failed when verifying KDC
May 042014
 

Since Google Reader shutdown its service in the middle of last year, Tiny Tiny RSS is one of the better alternatives that one could use for aggregating and reading RSS feeds. Next to the official Android app which unfortunately isn’t free of charge, there is an alternative called TTRSS-Reader which even supports offline synchronization. This combination makes me very happy. But one thing that bothered me since a while, was that subscribing to new feeds was very easy during the days of Google Reader. Today I finally figured out how to setup Firefox to automatically subscribe to a Tiny Tiny RSS instance.

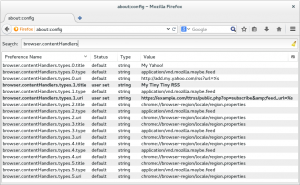
First go to the about:config page in your Firefox and search for the keys starting with browser.contentHandlers. Here we can configure a title and a URI which is later given as choice when subscribing to a feed. E.g:

  • browser.contentHandlers.types.1.title: My Tiny Tiny RSS
  • browser.contentHandlers.types.1.type: application/vnd.mozilla.maybe.feed
  • browser.contentHandlers.types.1.uri: URL of your TT-RSS instance

The subscriber URL for TT-RSS looks like the following. Of course you have to substitute the domain name with your domain:

https://example.com/ttrss/public.php?op=subscribe&feed_url=%s

At the end, the Firefox configuration should look similar to this screenshot:

Firefox-RSS-about:config

After the configuration is done, you have to restart Firefox. If you then browse to a Web site with a RSS feed and you click on it, the Firefox feed subscribtion page will appear. There you eventually can select the newly created entry for Tiny Tiny RSS:

Subscribe feed

After selecting the entry, you’ll be redirected to your Tiny Tiny RSS instance, where you can configure the feed settings such as category and more.

With this last piece of configuration, there is definitely nothing left anymore that makes me miss the time with Google Reader. 🙂

Dec 022012
 

FreeIPA is an integrated user, host and service identity management solution combining 389 Directory Server (LDAP), MIT Kerberos, a BIND DNS server and the Dogtag Certificate Authority service with a simple but powerful Web GUI and an extensive command line interface for easy administration. It claims to become something like an Active Directory for Linux and Unix environments and is heavily pushed by Red Hat, which also integrates it as IPA server in their Red Hat Enterprise Linux distribution. A nice overview can be found in this presentation.

After having the pleasure of playing around with the Red Hat IPA server on RHEL and CentOS for the past few weeks, I also wanted to use this excellent identity management platform with my Gentoo Linux boxes. Some years ago, a bug report was opened in the Gentoo bugzilla (#297665), to coordinate the inclusion of FreeIPA in Gentoo. Andreis Vinogradovs, another Gentoo user, then started an effort, to write some of the necessary ebuilds for building FreeIPA, however they are still far from complete and therefore haven’t made it into the official Gentoo repository yet. This means that FreeIPA is unfortunately still not fully available for Gentoo.

Based on Andreis’ work, I started another effort, to update and polish the FreeIPA ebuild and its dependencies, so that they can be used on a Gentoo Linux box. The server part has dozens of dependencies not yet officially integrated in Gentoo, and the available ebuilds are mostly outdated, so I haven’t put too much effort yet into integrating the server parts on Gentoo. Especially the entire PKI infrastructure is still missing.

However, I succeeded to configure a Gentoo box as full-featured FreeIPA client, including OpenRC support for `authconfig` and `ipa-client-install`. I also found and reported some bugs in official Gentoo ebuilds (#445394, #445478), where you have to work-around in case you try out the setup yourself.

Of course you are curious now, where you can find the ebuilds. Because the work on them and especially the testing is still ongoing, I created a repository on Github so that everybody who is interested can have a look at ebuilds and provide constructive feedback in terms of pull requests.

I’m especially looking for people who would like to try the FreeIPA client with a Gentoo systemd or/and a hardened SELinux system.

How can you test the FreeIPA client on your Gentoo box?

You have to begin with setting up a (Free)IPA server, which is currently only possible on a Red Hat-based distribution. The easiest way is to setup a CentOS 6 VM, then run:

[root@centos6 ~]# yum install ipa-server
[root@centos6 ~]# ipa-server-install

More information can be found in the upstream installation guide.

Then add the ‘freeipa-overlay’ to the layman configuration of your Gentoo client. How you do this is described here.

ATTENTION: This guide is meant to be for experimental testing only. Don’t do this on your workstation if you are not familiar with FreeIPA and its technologies. I don’t take any responsibility if you blow up your machine. You have been warned!

Finally you are ready to emerge FreeIPA. Make sure tho have a look at the various
USE flags. They don’t have too much influence on build-time functionality but
on run-time dependencies. So you can slim down your installation in case you
already know, that you don’t need another DNS server or winbind support for
example. Set the ‘minimal’ USE flag for only building the IPA client
(Update 07.12.2012: This USE flag was replaces with ‘server’, so the client will be installed by default):

gentoo ~ # emerge -av freeipa

Some keyword unmasking may be required when you run a stable Gentoo installation.

Before you can start your IPA client installation, you have to make sure, that an empty NSS certificate database exists. This is expected to be under /etc/pki/nssdb. Gentoo however puts all the SSL stuff under /etc/ssl. I solved this by creating a symlink:

gentoo ~ # ln -s ssl /etc/pki
gentoo ~ # certutil -N -d /etc/pki/nssdb

Eventually the IPA client can be configured. E.g.:

gentoo ~ # ipa-client-install --mkhomedir --no-dns-sshfp
Discovery was successful!
Hostname: gentoo.example.com
Realm: EXAMPLE.COM
DNS Domain: example.com
IPA Server: centos6.example.com
BaseDN: dc=example,dc=com

Continue to configure the system with these values? [no]: yes
User authorized to enroll computers: admin
Synchronizing time with KDC...
Password for admin@EXAMPLE.COM:

Enrolled in IPA realm EXAMPLE.COM
Created /etc/ipa/default.conf
Domain example.com is already configured in existing SSSD config, creating a new one.
The old /etc/sssd/sssd.conf is backed up and will be restored during uninstall.
Configured /etc/sssd/sssd.conf
Configured /etc/krb5.conf for IPA realm EXAMPLE.COM
SSSD enabled
Configured /etc/openldap/ldap.conf
NTP enabled
Configured /etc/ssh/ssh_config
Warning: Installed OpenSSH server does not support dynamically loading
authorized user keys. Public key authentication of IPA users
will not be available.
Configured /etc/ssh/sshd_config
Client configuration complete.

That’s it! Your system is now able to use user accounts created on the IPA server. Check it with:

gentoo ~ # id admin
uid=155960000(admin) gid=155960000(admins) groups=155960000(admins)

As you can see in the generated /etc/pam.d/system-auth, pam_unix will be checked before pam_sssd. This means your local user accounts still have precedence towards the IPA accounts.

Happy testing… 🙂

Oct 032007
 

Recently I wanted to set up a testing server for the different virtualization techniques for Linux. For this I have an Asus P5LD2 mainboard with an Intel dual core Pentium D 3,2 GHz which supports the Virtual Machine Extensions (VMX). Thanks to this I can compile Xen with the ‘hvm’ USE-flag and run fully virtualized guest operating systems on my Xen supervisor. This means I could run nearly every i386 compatible operating system (even Windows 😉 ) in my Xen environment. Without such hardware every guest operating system has to have a Xen enabled kernel.

Another approach with the same result is the open source project QEMU. Its abstraction level is higher than with Xen and it can even emulate different target architectures from your current x86 host. So far x86_64, ARM, SPARC, PowerPC, MIPS and M68k target systems are supported. Its guest operating system does not need any single change to run on QEMU. This makes it very comfortable to test new live CDs or operating system images. But it is not so trivial to setup QEMU and Xen together on a Gentoo machine.

How to setup QEMU on 32bit Gentoo in Xen dom0?

If you compile Xen on a 32bit host you have to add ‘-mno-tls-direct-seg-refs’ to your CFLAGS. That is because the glibc TLS library is implemented in a way that will conflict with how Xen uses segment registers. For compiling the non-patched QEMU 0.9.0 you have to use a gcc version 3.x. The nowadays default gcc 4.x is not yet supported. After several compile failures I finally found to setup QEMU the following way:

1. For compiling gcc-3.x remove the ‘-mno-tls-direct-seg-refs’ from /etc/make.conf and set the ‘nossp’ and ‘nopie’ USE-flags. Otherwise gcc or later qemu will not compile.

2. Switch to gcc-3.x before compiling qemu-softmmu, qemu-user and qemu. In my case it’s: gcc-config i686-pc-linux-gnu-3.3.6

3. Check your CFLAGS again because the optimization flags for gcc 4.x are not always backwards compatible to gcc-3.x. In my case the make.conf looks like this:

# gcc-3.x
CFLAGS="-march=pentium4 -O2 -pipe -fomit-frame-pointer -mno-tls-direct-seg-refs"

# gcc-4.x for compiling gcc-3.3
#CFLAGS="-march=prescott -O2 -pipe -fomit-frame-pointer"

# gcc-4.x
#CFLAGS="-march=prescott -O2 -pipe -fomit-frame-pointer -mno-tls-direct-seg-refs"

4. Now you can compile QEMU. Do not forget to switch back to your original CFLAGS and gcc-4.x after successfully emerging QEMU. I recommend to you to also build the QEMU kernel accelerator module kqemu which has to be compiled with the same compiler as the kernel itself.

Now Xen and QEMU are able to run whatever operating system image you give them. Have fun with playing around…

Additional links:

Sep 262007
 

For organizing our move to the shared flat I was looking for a small, simple to use Wiki for collecting ideas and coordinating our flat inventory. After a little search I found DokuWiki. It can be easily installed by every Linux distribution’s package manager. Unfortunately the stable Debian package was not the newest version and annoyed me with banners that there are some upgrades available. So I tried again with the newest version from the developers site. After unpacking, the directory has to be made accessible through your Web server and after running the install.php where you actually only create the administrator user, the Wiki is already prepared to use. In the default configuration there is no database needed. But the strength of this Wiki is that it can be expanded by more sophisticated configurations using MySQL or an LDAP back-end for user administration. The syntax is quite simple and similar to other Wiki systems. Also my friends were surprised by the usability of this piece of Open Source software. So if you are planning to use a powerful but simple Wiki software, keep an eye on DokuWiki.

Aug 162007
 

Most of you may have a similar problem. A lot of friends are present in the Internet but all of them use a different instant messenger. There are ICQ, MSN, Yahoo Messenger, Jabber and a lot more. With multi-protocol messenger like Pidgin (former Gaim) or Adium it is not that laborious to manage all your contacts anymore. But still you would like to reduce your number of accounts as much as possible.

Once more open source software gives an example how it could be. The protocol is called XMPP and originally used by Jabber. When Google introduced their own messenger GoogleTalk in 2005 they made the wise decision to also use XMPP instead of inventing a new protocol. The next big thing is that everybody with a Gmail account can also use this credentials for GoogleTalk. One account connects you to your friends of two networks. Why is not everything in information technology so handy?

Now you are maybe wondering that Gaim/Pidgin does not support GoogleTalk. But it does support Jabber/XMPP. So it is an easy thing to set up your GoogleTalk account. Enter your Gmail address as “Screen Name”; the server is not “jabber.org” but “gmail.com” and the connect server is “talk.google.com”. As resource you can leave “Home”. Finished and ready for chatting…

Jul 242007
 

I think everybody that runs an own Linux server with the SSH daemon listening on port 22 is sooner or later annoyed by the amount of password attacks done by bots somewhere out in the Internet. What can you do against it?

Blocking via iptables ‘recent’ module
How you can do this on a Gentoo system is described in the Gentoo Wiki here. Because it blocks the connection attempt only due to the number of tries within a certain time it is a very basic solution and needs quite a lot of testing to examine the good parameters for the ‘hitcount’ and ‘seconds’ arguments. You do not unintentionally want to block yourself when you only try to open several connections within a short time period. So not really the thing I recommend here.

Log parsing with sshguard
sshguard uses another approach. It parses the SSH log messages and searches for login failures. For example when you try to connect with a non-existent user sshguard catches it and creates an iptables deny rule. But also sshguard has a small design mistake. It wants you to create a sshguard chain in iptables and redirect all the traffic to the chain assuming that your default INPUT policy is ACCEPT. When it wants to block a host it runs iptables -A sshguard -s host-to-block -j DROP. In case you have your policy set to DROP you cannot configure the iptables to accept the allowed SSH traffic because else the blocking rules will not work anymore. I made a small patch to change the blocking command to insert the rule in first place of the chain. After you applied the patch you have to make sure that you setup your iptables the following way:

iptables -N sshguard
iptables -A sshguard -j ACCEPT
iptables -A INPUT -p tcp --dport ssh -j sshguard

Further you have to edit your system logger configuration file. Please read the documentation.

For all the lazy people I even made a Ebuild that also adds a second patch where you can disable the IPv6 ability of sshguard. You can find it here.