Aug 282014
 

Today I just found out, how super easy it is to setup a safe HTTP authentication via Kerberos with help of FreeIPA. Having the experience of managing a manually engineered MIT Kerberos/OpenLDAP/EasyRSA infrastructure, I’m once again blown away by the simplicity and usability of FreeIPA. I’ll describe with only a few commands which can be run within less than 10 minutes how it’s possible to setup a fully featured Kerberos-authenticated Web server configuration. Prerequisite is a FreeIPA server (a simple guide for installation can be found for example here) and a RedHat-based Web server host (RHEL, CentOS, Fedora).

Required Packages:
First we are going to install the required RPM packages:

# yum install httpd mod_auth_kerb mod_ssl ipa-client

Register the Web server host at FreeIPA:
Make sure the Web server host is managed by FreeIPA:

ipa-client-install --domain=example.com --server=ipaserver.example.com --realm=EXAMPLE.COM --mkhomedir --hostname=webserver.example.com --configure-ssh --configure-sshd

Create a HTTP Kerberos Principal and install the Keytab:
The Web server is identified in a Kerberos setup through a keytab, which has to be generated and installed on the Web server host. First make sure that you have a valid Kerberos ticket of a FreeIPA account with enough permissions (e.g. ‘admin’):

# kinit admin
# ipa-getkeytab -s ipaserver.example.com -p HTTP/webserver.example.com -k /etc/httpd/conf/httpd.keytab

This will create a HTTP service principal in the KDC and install the corresponding keytab in the Apache httpd configuration directory. Just make sure that it can be read by the httpd server account:

# chown apache /etc/httpd/conf/httpd.keytab

Create a SSL certificate
No need to fiddle around with OpenSSL. Requesting, signing and installing a SSL certificate with FreeIPA is one simple command:

# ipa-getcert request -k /etc/pki/tls/private/webserver.key -f /etc/pki/tls/certs/webserver.crt -K HTTP/webserver.example.com -g 3072

This will create a 3072 bit server key, generate a certificate request, send it to the FreeIPA Dogtag CA, sign it and install the resulting PEM certificate on the Web server host.

Configure Apache HTTPS
The httpd setup is the only and last configuration which needs to be done manually. For HTTPS set the certificate paths in /etc/httpd/conf.d/ssl.conf:

[...]
SSLCertificateFile /etc/pki/tls/certs/webserver.crt
SSLCertificateKeyFile /etc/pki/tls/private/webserver.key
SSLCertificateChainFile /etc/ipa/ca.crt

Additionally do some SSL stack hardening (you may also want to read this):

[...]
SSLCompression off
SSLProtocol all -SSLv2 -SSLv3 -TLSv1.0
SSLHonorCipherOrder on
SSLCipherSuite "EECDH+ECDSA+AESGCM EECDH+aRSA+AESGCM EECDH+ECDSA+SHA384 EECDH+ECDSA+SHA256 EECDH+aRSA+SHA384 EECDH+aRSA+SHA256 EECDH EDH+aRSA !aNULL !eNULL !LOW !3DES !MD5 !EXP !PSK !SRP !DSS !RC4"

Kerberos HTTP Authentication:
The final httpd authentication settings for ‘mod_auth_kerb‘ are done in /etc/httpd/conf.d/auth_kerb.conf or any vhost you want:

<Location />
  SSLRequireSSL
  AuthType Kerberos
  AuthName "Kerberos Login"
  KrbMethodNegotiate On
  KrbMethodK5Passwd On
  KrbAuthRealms EXAMPLE.COM
  Krb5KeyTab /etc/httpd/conf/httpd.keytab
  require valid-user
</Location>

That’s it! After restarting the Web server you can login on https://webserver.example.com with your IPA accounts. If you don’t already have a valid Kerberos ticket in the Web client, KrbMethodNegotiate On enables interactive password authentication.

Troubleshooting
In case you get the following error message in the httpd error log, make sure the keytab exists and is readable by the httpd account (e.g. ‘apache’):

[Wed Aug 27 07:23:04 2014] [debug] src/mod_auth_kerb.c(646): [client 192.168.122.1] Trying to verify authenticity of KDC using principal HTTP/webserver.example.com@EXAMPLE.COM
[Wed Aug 27 07:23:04 2014] [debug] src/mod_auth_kerb.c(689): [client 192.168.122.1] krb5_rd_req() failed when verifying KDC
May 162014
 

I recently bought a PC Engines APU1C4 x86 embedded board which is meant to be the board for my future custom NAS box. In comparison to the various ARM boards it promises to be powerful and I/O friendly (3x Gbit LAN, SATA, 3x mini PCIe) and doesn’t include redundant graphics and sound circuits. On the other hand the only way to locally access it is via a serial terminal. Before installing the final system, hopefully more about this in a later article, I wanted to have a quick glance at the system from a Linux point of view. I tried booting the device over an USB stick prepared with my favorite live system SystemRescueCD, which by the way is based on Gentoo, but somehow failed as the boot process didn’t support output on a serial device and never spawned a terminal on it either. Before loosing too much time in searching for another media which would support a serial console, I simply setup my own minimal boot system based on Fedora 19. Here will follow a quick summary on what was required to achive this, as I couldn’t find a good and recent how-to about such a setup either. Because this minimal system is meant for ad-hoc booting only, I will keep things as simple as possible.

Prepare the installation medium

The APU1C4 supports booting over all possible storage devices, so you need to have a spare USB stick, external USB disk, mSATA disk, SATA disk or a SD card for storing the minimal Linux installation. Create at least one partition with a Linux file system of your choice on it and mount it. This will be the root directory of the new system. The following example will show how the setup is done on a device /dev/sdb with one partition mounted to /mnt/usbdisk:

host # mount /dev/sdb1 /mnt/usbdisk

Bootstrap minimal Fedora system in alternative root directory

Redhat-based distributions have an easy way to install a new system to an alternative root directory. Namely, it can be done with the main package manager yum. To keep it easy I used a Fedora 19 host system to setup the boot disk. While being in the context of the host system (below indicated with ‘host #‘), always be careful that your commands are actually modifying the content under /mnt/usbdisk. Otherwise you might have a bad surprise when you reboot your host system the next time.

1. Prepare RPM database:

host # mkdir -p /mnt/usbdisk/var/lib/rpm
host # rpm --root /mnt/usbdisk/var/lib/rpm --initdb

2. Install Fedora release package:

host # yumdownloader --destdir=/tmp fedora-release
host # rpm --root /mnt/usbdisk -ivh /tmp/fedora-release*rpm

3. Install a minimal set of packages (add whatever packages you’d like to have in the minimal system):

host # yum --installroot=/mnt/usbdisk install e2fsprogs kernel \
rpm yum grub2 openssh-client openssh-server passwd less rootfiles \
vim-minimal dhclient pciutils ethtool dmidecode

4. Copy DNS resolver configuration:

host # cp -p /etc/resolv.conf /mnt/usbdisk/etc

5. Mount pseudo file systems for chroot:

host # mount -t proc none /mnt/usbdisk/proc
host # mount -t sysfs none /mnt/usbdisk/sys
host # mount -o bind /dev /mnt/usbdisk/dev

5. chroot into the new system tree to finalize the installation:

host # chroot /mnt/usbdisk /bin/bash

6. Set root password

chroot # passwd

7. Prepare system configurations:

chroot # echo "NETWORKING=yes" > /etc/sysconfig/network

8. If you only have one partition with the entire system, a fstab is not needed anymore as dracut and Systemd will already know how to mount it. Otherwise create the fstab (use the UUID if you’re not sure how the disk will be called on the target system):

chroot # dumpe2fs -h /dev/sdb1 | grep UUID
dumpe2fs 1.42.7 (21-Jan-2013)
Filesystem UUID: bfb2fba1-774d-4cfc-a978-5f98701fe58a
chroot # cat << EOF >> /etc/fstab
UUID=bfb2fba1-774d-4cfc-a978-5f98701fe58a / ext4 defaults 0 1
EOF

9. Setup Grub 2 for serial console:

chroot # cat << EOF >> /etc/default/grub
GRUB_DEFAULT=0
GRUB_TIMEOUT=5
GRUB_DISTRIBUTOR="Fedora"
GRUB_CMDLINE_LINUX_DEFAULT=""
GRUB_CMDLINE_LINUX="console=ttyS0,115200n8 rd.lvm=0 rd.md=0 rd.dm=0 rd.luks=0 LANG=en_US.UTF-8 KEYTABLE=us"
GRUB_TERMINAL="serial"
GRUB_SERIAL_COMMAND="serial --unit=0 --speed=115200 --word=8 --parity=no --stop=1"
GRUB_DISABLE_OS_PROBER=true
EOF
chroot # grub2-install /dev/sdb
chroot # grub2-mkconfig -o /boot/grub2/grub.cfg

10. We’re done. Exit the chroot and unmount it:

chroot # exit
host # umount /mnt/usbdisk/dev
host # umount /mnt/usbdisk/proc
host # umount /mnt/usbdisk/sys
host # umount /mnt/usbdisk

Now you can remove the disk from the host and connect it with the embedded board you want to boot.

Connect to the serial console and start the system

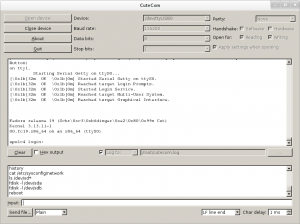
For connecting to the embedded board a USB to serial adapter and a null modem cable is required. There exist a number of tools to connect to a serial console on Linux which you probably already know (e.g. screen or minicom). However, I always found them painful to use. The tool of my choice is called CuteCom and is a graphical serial terminal. After selecting the correct serial device (/dev/ttyUSB0 in my case) and baud rate, you can power on your device and you’ll hopefully be greeted by the boot messages of your board and the freshly installed Linux system:

CuteCom

If there is no output in the terminal make sure, you use null-modem cable or adapter and not a simple serial extension cable. Further check for the correct serial port device in your serial terminal configuration and play around with the baud rate.

Good luck and have fun with your embedded device. 🙂

Apr 202014
 

Finally the day arrived, that I can say, I’m a Linux user since 10 years. On April 19 2004, I started my stage1 Gentoo Linux installation on my main workstation box. Since then, I changed my main desktop to Gnome, I adapted my work flow according to what’s possible with open source tools and I never looked back again to my old time with proprietary Windows tools.

However, I already made my first Linux experience a few years earlier than 2004. As far as I still remember, my first Linux distribution ever was SUSE Linux 7.0, which I was able to install without problems on an old computer of mine. I was kind of lost with this new concept that every small functionality is a program by itself, and why are these applications called so weird anyway? A bit later, I wanted to build a dedicated game and file server for LAN parties and it should run with an easy to maintain and lightweight alternative to Windows. The component that I was proud of the most in this server was a Promise SX4000 RAID controller which supported RAID5. I made sure that it was supporting Linux before buying it. At that time I learned the hard way, that Linux support doesn’t magically mean that the driver code is integrated into the upstream Linux kernel and therefore is supported by every Linux distribution. First, there were only some binary modules available, so my distribution for the server was Red Hat Linux 7.2. At that time RPMs were still some kind of annoying black magic to me, as there was no automated dependency resolving available by default. I didn’t know about yum which was optionally available already. Eventually, I never really could make the server work properly in the way how I imagined. Also, I learned from my geek friends, that there is Gentoo, which would be the best Linux distribution anyway. With Gentoo Linux I finally succeeded to install my RAID adapter and I started learning a basic principle, which I still think it’s true today: “If some open source software doesn’t work how you want, you simply don’t try hard enough”. I then also started using Gentoo on my Apple iBook G3, which released me from some Apple Java 1.4 Swing weirdness I experienced during the University programming exercises. These achievements showed me… Linux, ehmn Gentoo Linux, is the way to go. 🙂

You may wonder, why I still remember exactly when I originally setup my Gentoo workstation. Simply, because thanks of the rolling release model of Gentoo, I’m still running the same installation since then. I still have my emerge.log around with the entire update history since day one. You want some goodies?

  • First emerged package:
         Mon Apr 19 14:47:13 2004 >>> sys-apps/portage-2.0.50-r6
           merge time: 28 seconds.
    
  • Original toolchain:
         Mon Apr 19 15:00:50 2004 >>> sys-devel/binutils-2.14.90.0.7-r4
           merge time: 4 minutes and 45 seconds.
    
         Mon Apr 19 15:41:29 2004 >>> sys-devel/gcc-3.3.2-r5
           merge time: 39 minutes and 34 seconds.
    
         Mon Apr 19 16:09:44 2004 >>> sys-libs/glibc-2.3.2-r9
           merge time: 28 minutes.
    
  • Original desktop environment and browser:
         Tue Apr 20 14:51:33 2004 >>> x11-base/xfree-4.3.0-r5
           merge time: 17 minutes and 26 seconds.
    
         Wed Apr 21 02:10:24 2004 >>> gnome-base/gnome-2.4.2
           merge time: 3 seconds.
    
         Wed Apr 21 11:18:36 2004 >>> net-www/mozilla-firefox-0.8-r2
           merge time: 42 minutes and 9 seconds.
    

It’s really interesting to dig around in this file. As you can see, it took a few days to compile the entire system, but at the end, I had a system which satisfied my expectations and still serves me well today.

With help of the emerge.log, I can also make some interesting comparisons on how PC hardware evolved. Building OpenOffice.org back then on a single core AMD Athlon XP and LibreOffice today on a six core AMD Phenom II, which is also rather antique already:

     Thu Sep 23 23:56:56 2004 >>> app-office/openoffice-1.1.2
       merge time: 6 hours, 18 minutes and 15 seconds.

     Sun Feb  9 11:35:57 2014 >>> app-office/libreoffice-4.1.4.2
       merge time: 1 hour, 2 minutes and 32 seconds.

If you are interested in more details of my Gentoo emerge history or if you know some tools to automatically analyze or graph the emerge.log, please leave me a comment below.

So how did I evolve during the last 10 years using Linux? I became an IT professional for Linux engineering, I was witnessing how open source software was gaining acceptance in the most conservative IT environments on one side and driving innovation and efficiency on the other side. This wouldn’t have been possible without Gentoo, which taught me to dig into documentation and community reports to solve the problems. A big thanks to Gentoo and the entire Linux and open source community for all their support and motivation! I had a great time with you for the last 10 years. At the beginning, I could have never imagined that today the majority of people are running a Linux-based mobile phone or that Linux is evolving so rapidly as gaming platform. I’m looking forward to the next 10 years with Linux and open source software…

Oct 162008
 

Xen is nowadays a widespread approach to run virtual hosts. Thanks to its flexible configuration it’s not only possible to run virtual Linux hosts but nearly any operating system that is compatible to the Xen hypervisor machine architecture will possibly run as guest host. The Xen paravirtualization Continue reading »